1.34.0 - Rapid Platform

01/02/2024
Features
1. Create multiple items from within workflow.
A simple scenario
Imagine an office furniture retail business. It has received an order of:

The sales manager wants to create an invoice for the customer. The business already has an Inv Line Items Table. The sales manager needs to enter all the details to the Inv Line Items Table and then generate an invoice.
This new feature helps to automate the above and many such scenarios.
The order items can now be automatically created into invoice lines without the manager having to manually create them.
Now Rapid Platform can create multiple (dynamic) items in a desired table using the workflow.
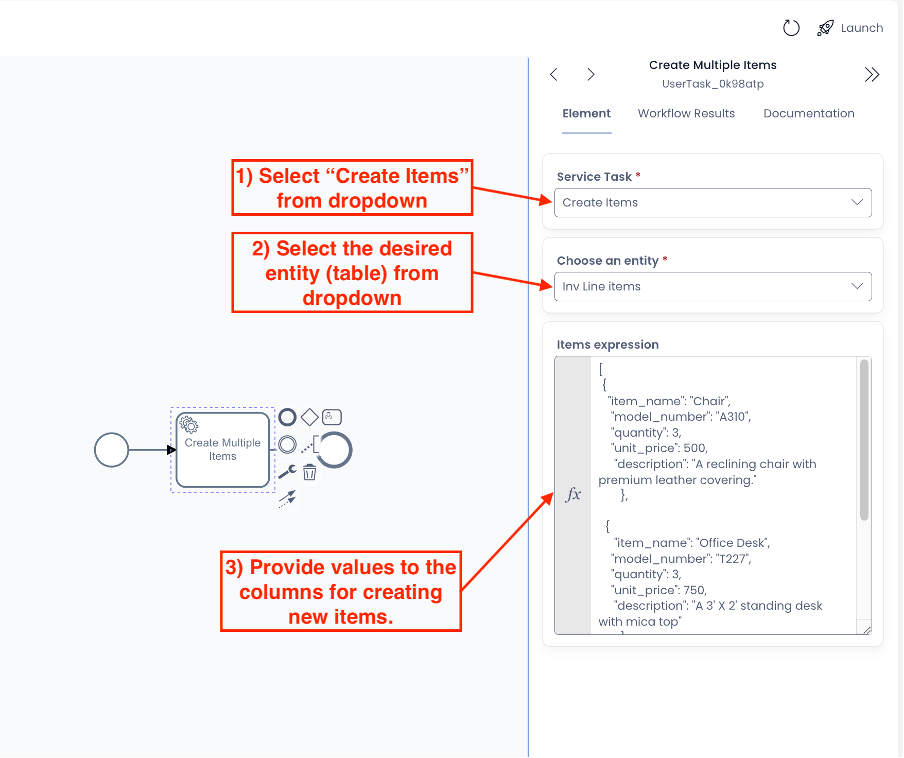
Create Items Service Task
There is a new type of service task – “Create Items”. It can enable you to create multiple items in a desired data table.
We will try to simulate the above scenario in the system using the Create Items service task.
The Create Items service task has two parameters:
-
Choose an entity – you can select the desired table here, where you want the workflow to create items.
-
Items expression – provide the values for the item columns here as an expression.
The workflow runs successfully.
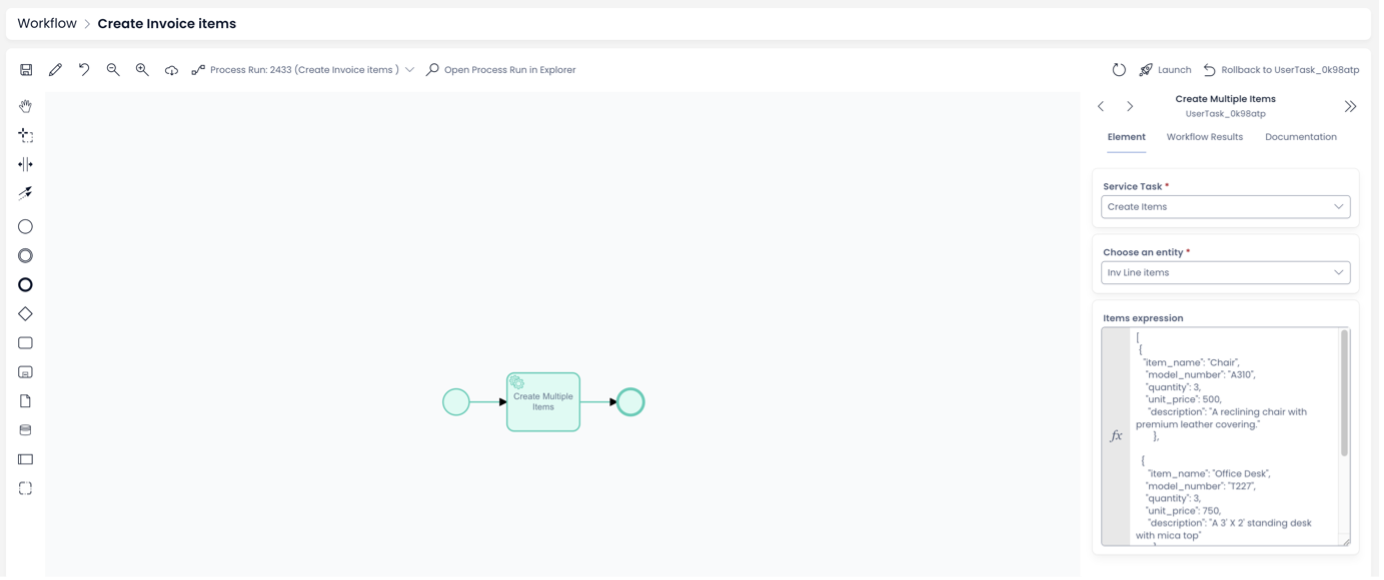
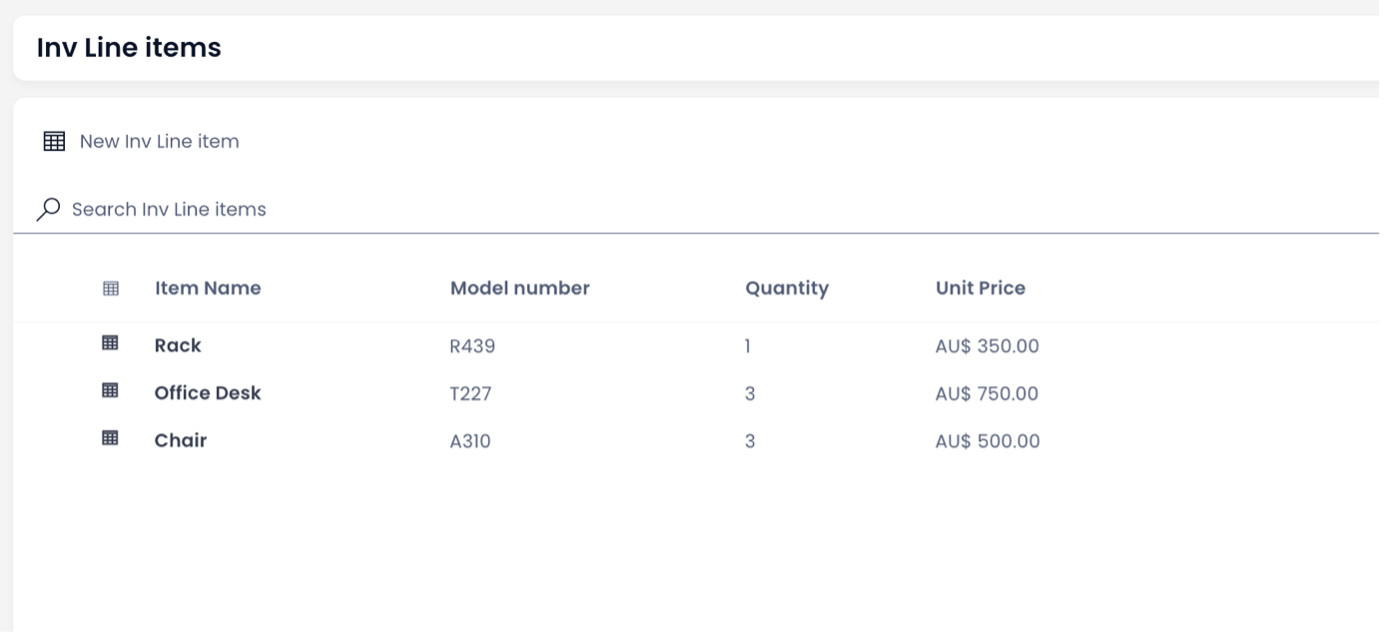
Items are created in Inv Line Items Table by the workflow execution.
- You need to provide the column name from the table and not the column title.
- You can pass values to the table items using LODASH / JSON. An example of this can be seen in the next feature.
- You can pass dynamic values to the service task, however, for the sake of simplicity, we are illustrating with static values.
2. Trigger a workflow from a menu item and pass multiple data table items as an array.
Continuing the Office Furniture Retail business scenario
Now the sales manager has the Invoice line Items entered into the table automatically. However, there is a need to create an invoice for the same.
The need is to have multiple items into a single document.
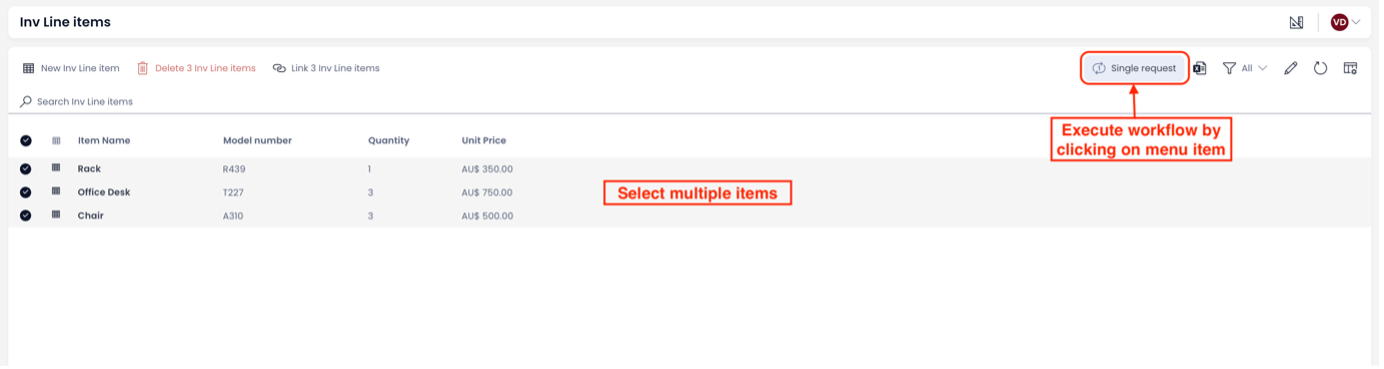
This new feature will enable the user to select multiple items from a Data Table in Explorer and click a menu item to execute a workflow. The workflow execution will happen once and the data of all the items will be passed to it as an array.
Essentially it offers the ability for a user to select multiple items from a list view, press a menu button, and for these to be available in the workflow via the start_event.
Generating a pdf with the selected items from Explorer can be another use case for this feature. There can be other useful applications as well.
Workflow Execution Menu item - Single request
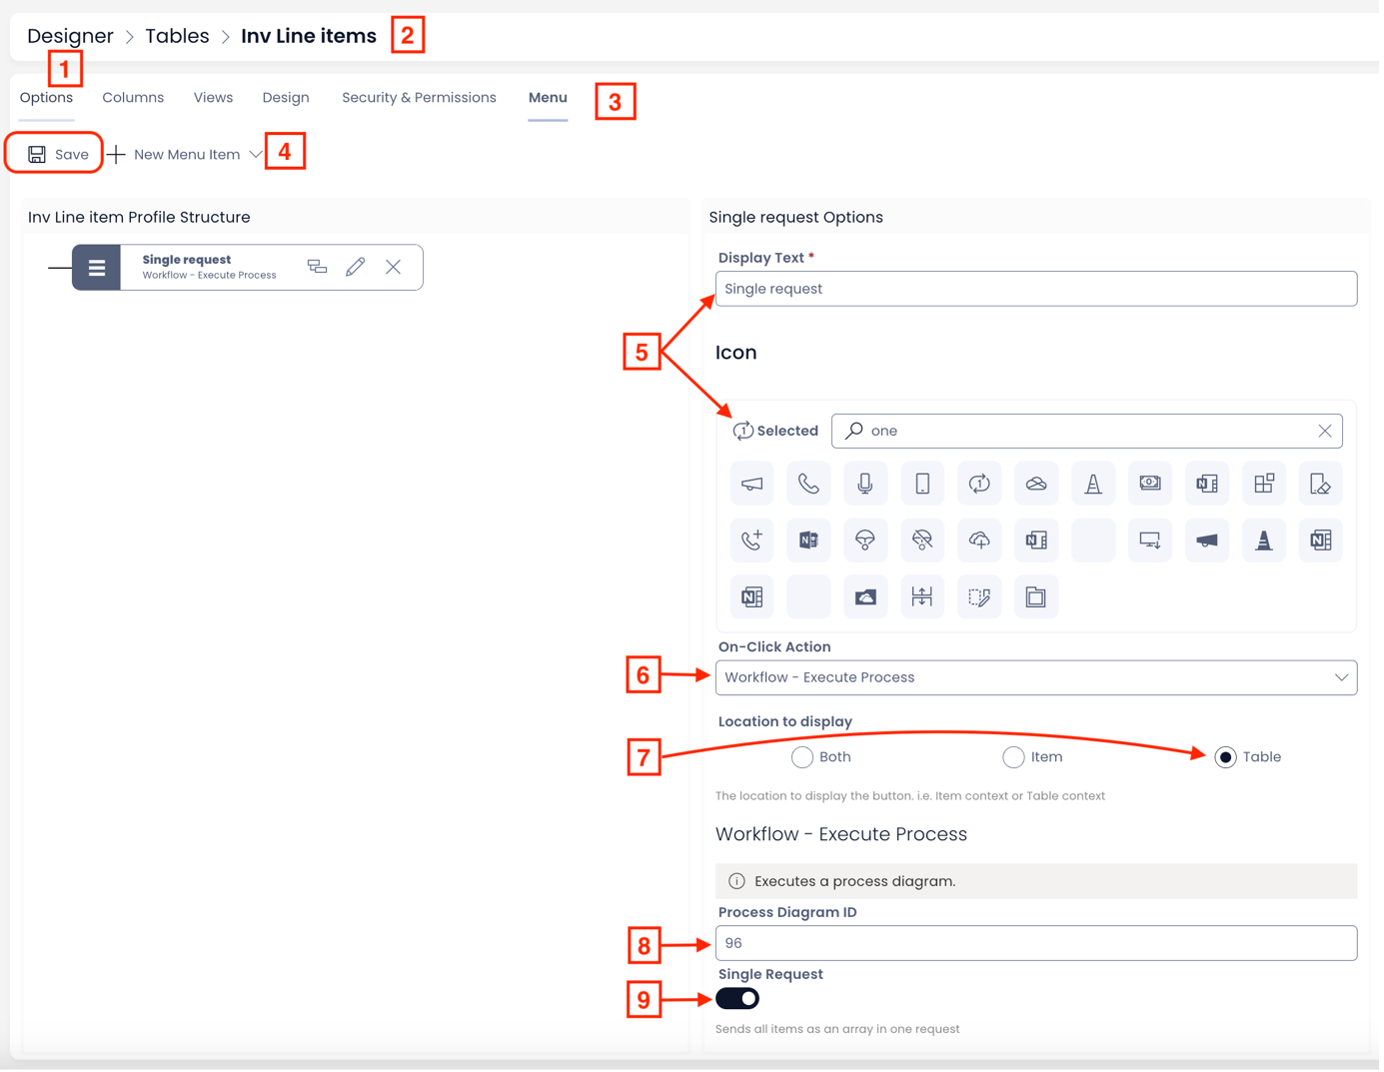
To set up this menu item, please follow the below steps:
- Navigate to Designer.
- Go to your desired table.
- Click on Menu Tab.
- Create a New Blank Menu Item.
- Give it a name and select an icon identifier.
- Select On-Click Action as “Workflow – Execute Process”.
- Select Location to display as “Table”.
- Provide Process Diagram ID (this id is present in the url of the process diagram)
- Toggle on – Single Request.
- Click Save.
We have configured the menu button to call a defined workflow. This menu can be triggered from Explorer window and the system should pass the selected items from the Table in Explorer to the workflow.
The menu item appears on the Data Table List view in Explorer, as configured.
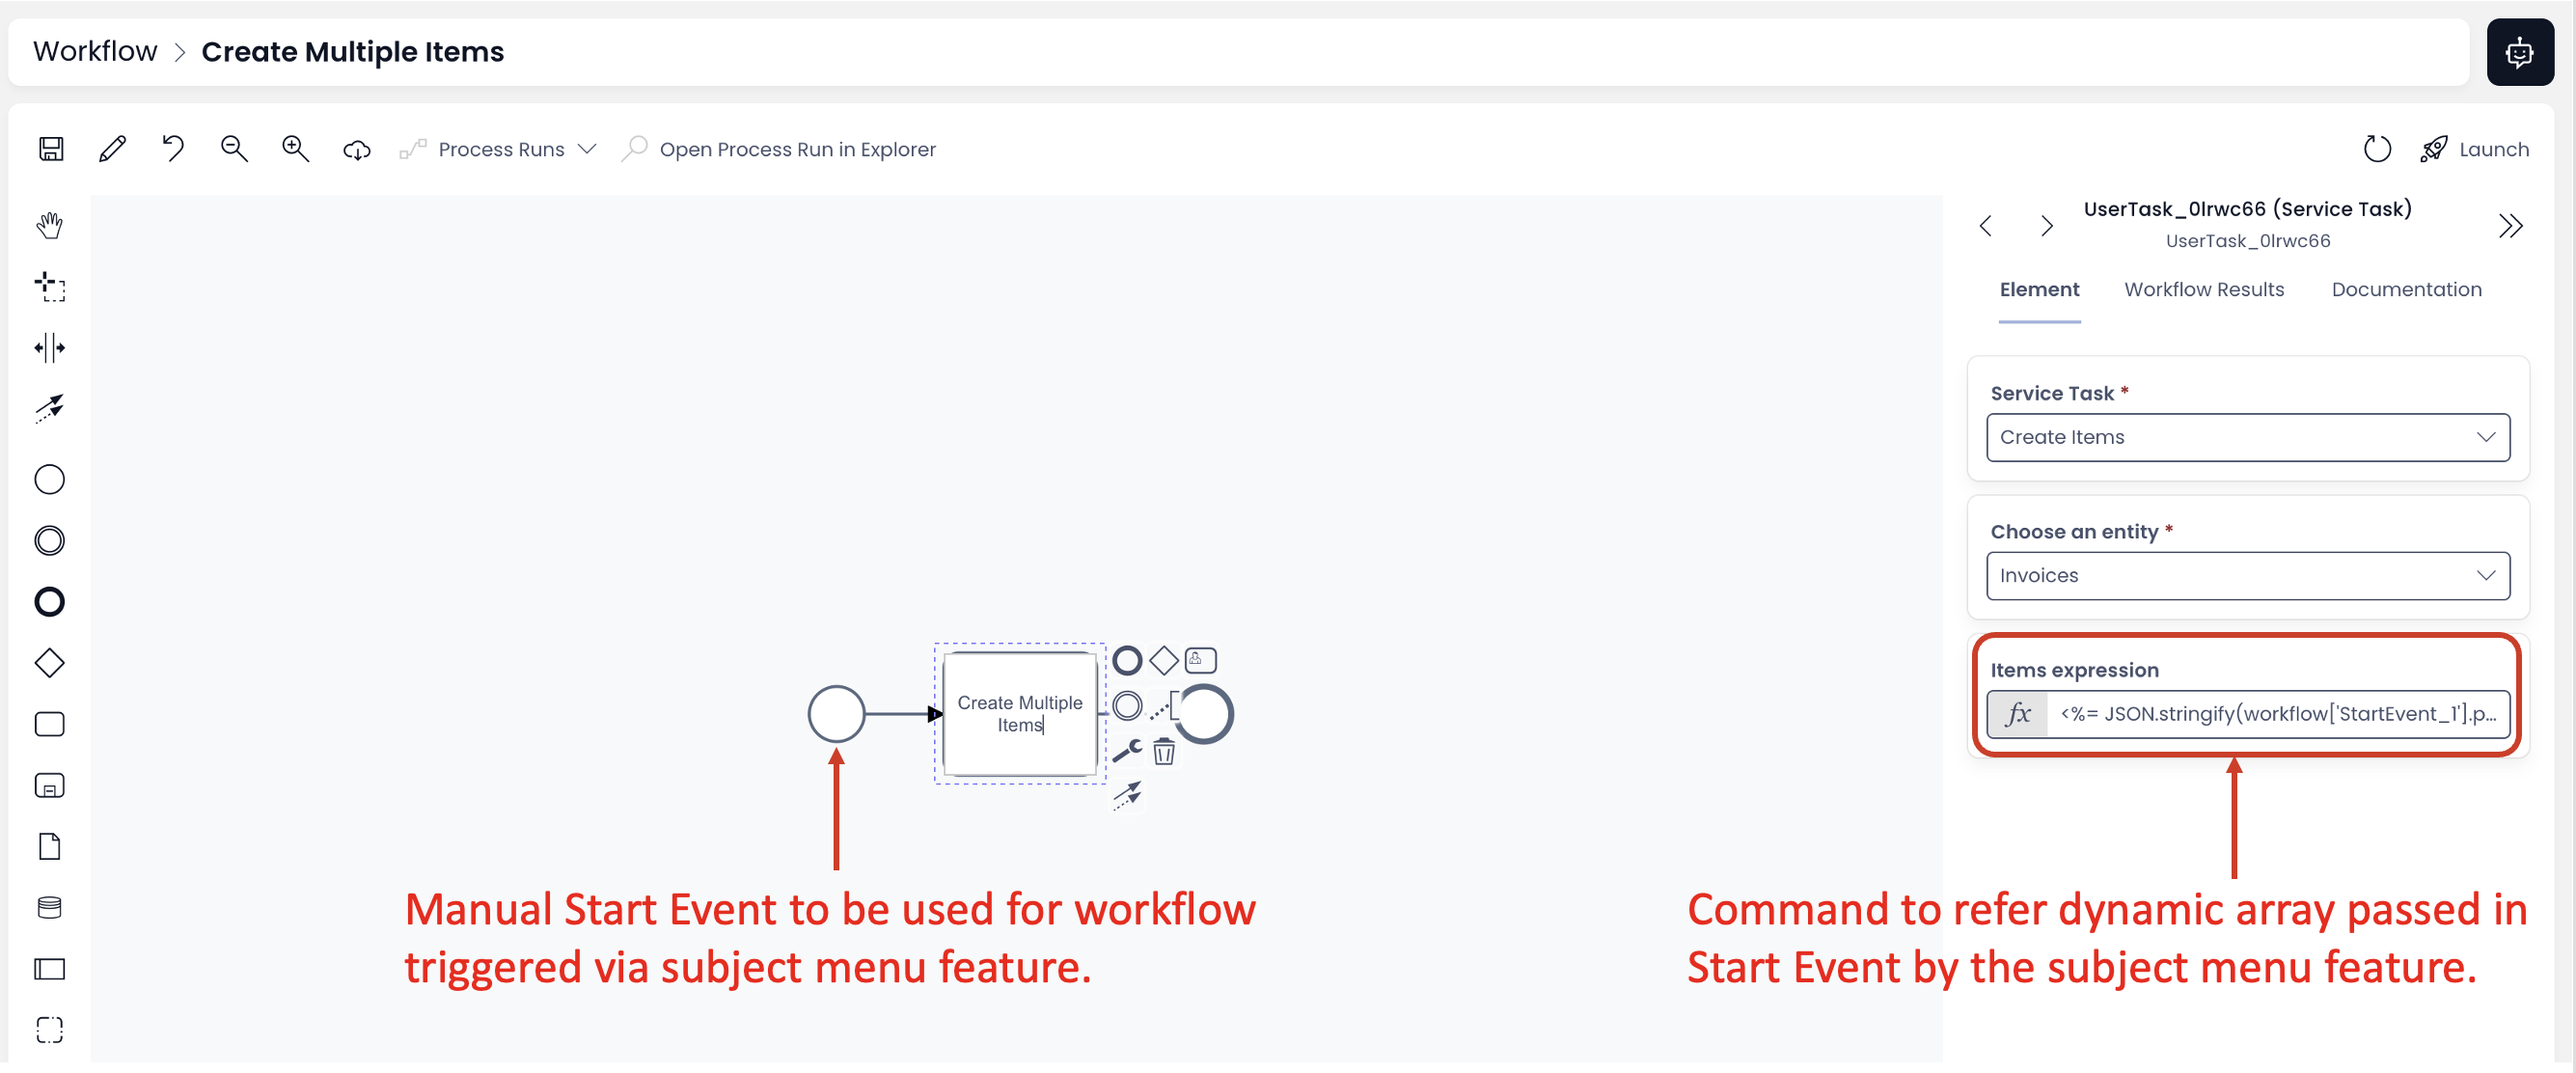
Before proceeding forward let us take a look at the workflow setting as well. The below image shows the workflow design. Please note we are extending illustration from previous feature, hence the use of Create Items type of Service Task.
-
The workflow being triggered via the subject menu button should always have a Manual Start Event. Any other type of Start Event (like Signal Start Event) would not give desired results when called via menu.
-
When the menu button is clicked from Explorer window, it will trigger the defined workflow. The information about the selected items shall appear in the Start Event (Workflow Results).
-
Reference can be made to Start Event as shown in the configuration of Create Items task. Use the JSON command -
<%= JSON.stringify(workflow['StartEvent_1'].properties.items) %>. Copy this command in the Items Expression of Create Items task.
JSON.stringify() function prompts the system to consider the list of items data as a single array.
- Just like Create Items task shown in this example, you can configure workflow to any other task like Send Email / Fill document etc.
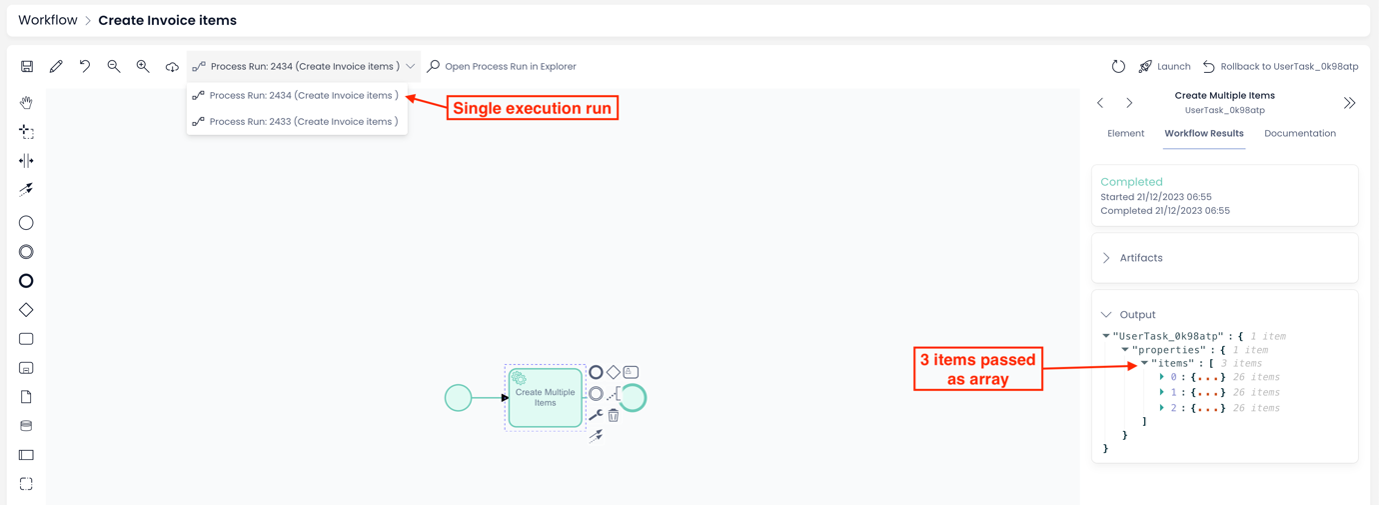
As depicted below, upon the click of the menu, the workflow is executed once. The output of the Service Task shows three items being passed as an array.
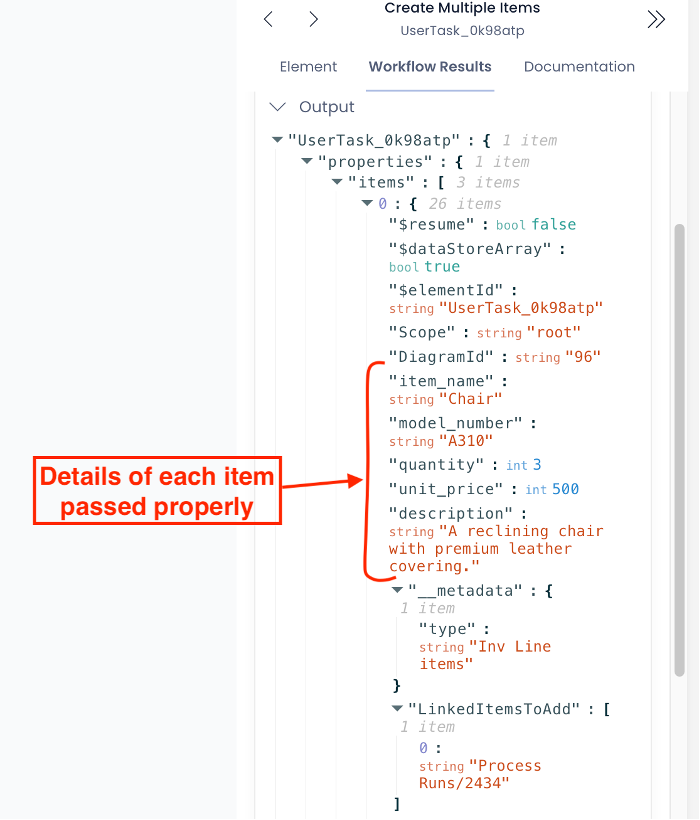
Upon expanding the array in the output of the service task, it is found that data for all the items (selected in Explorer) is passed properly.
The key parameter in the menu item is Single Request (toggle). It guides the system that upon click of the subject menu item, only a single run of the defined workflow should occur. Hence, all the selected data table items data is passed as an array.
3. Trigger a workflow from a menu item and pass multiple data table items as individual entities to the process run
Continuing the Office Furniture Retail business scenario
Now the sales manager got the invoice generated automatically. He must pass on this information to the Store manager for order fulfillment.
Imagine the store has chairs in the required quantity, however, the desk and rack aren’t there. The Procurement manager is intimated to place an order for these items from different vendors.
The Procurement manager needs to select multiple items but does not want to send it as an array to a single entity, rather to different entities.
Hence, the need is to select multiple items from the data table. Run the workflow process flow using the menu item, however, instead of a single run, there should be multiple runs of the process. Each process run of the workflow will have data from one (and only one) item of the data table.
Other use cases many include:
- Sending emails to a select list of customers
- Sending surveys to a select list of employees
Workflow Execution Menu item - multiple request
Please note:
To demonstrate this new feature, we will create a new menu item.
All the settings will remain the same as discussed above (single request).
The only change – Single Request field is Toggled OFF.
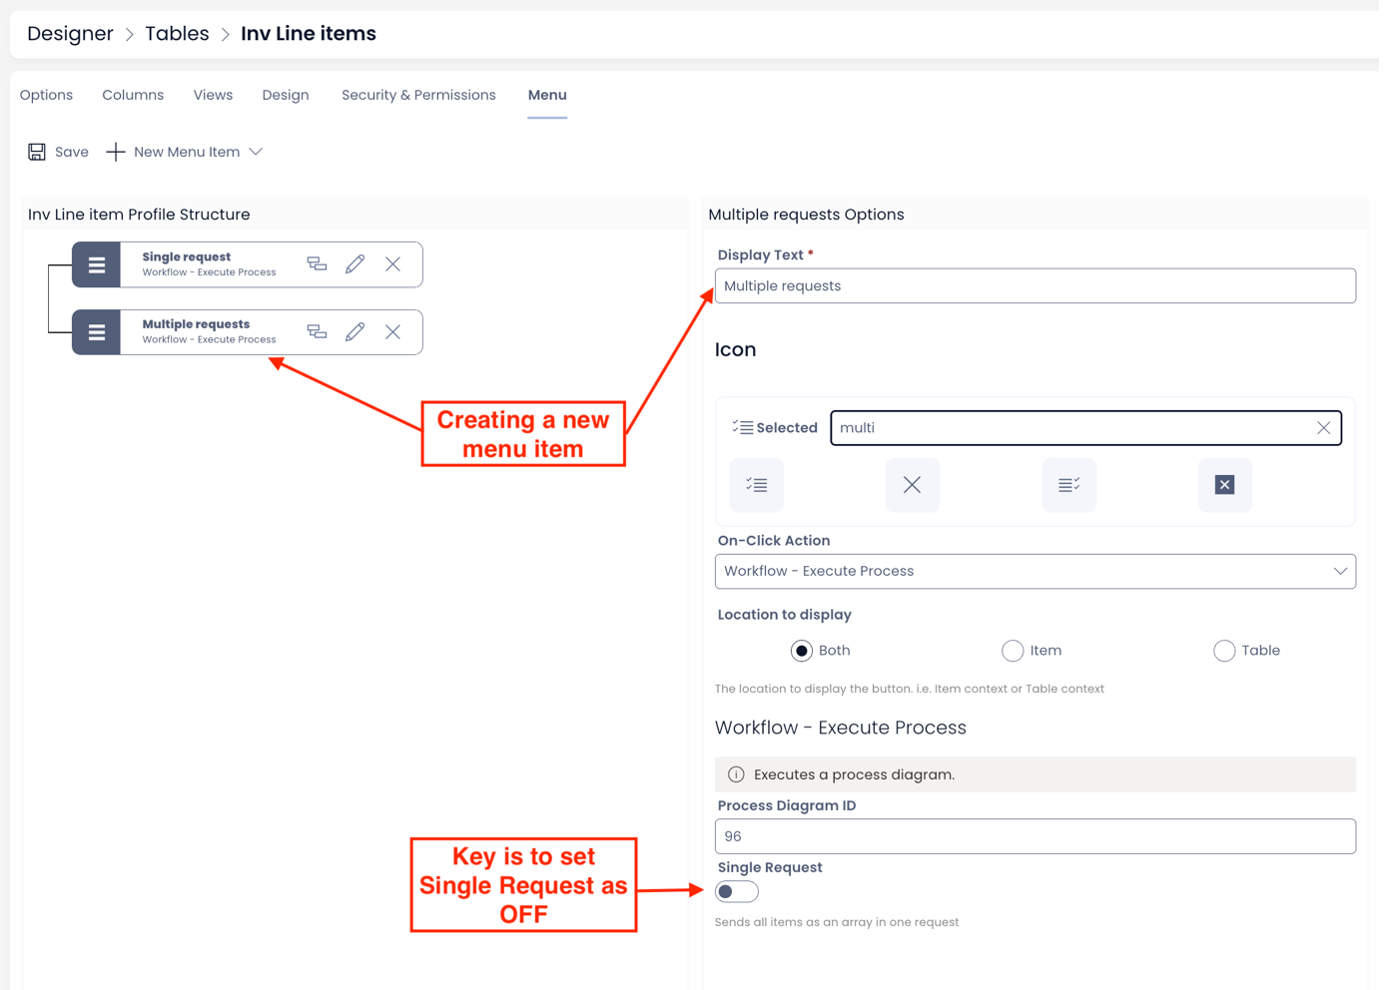
The menu item appears on the Data Table List view in Explorer, as configured.
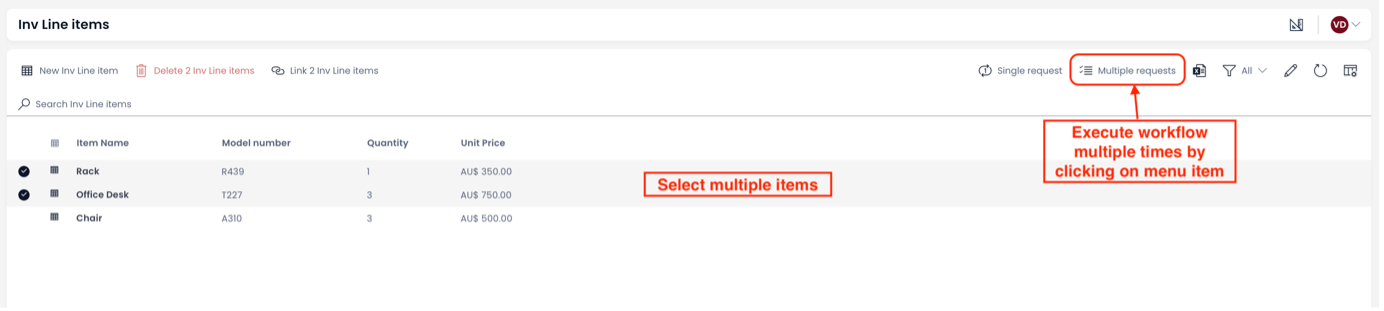
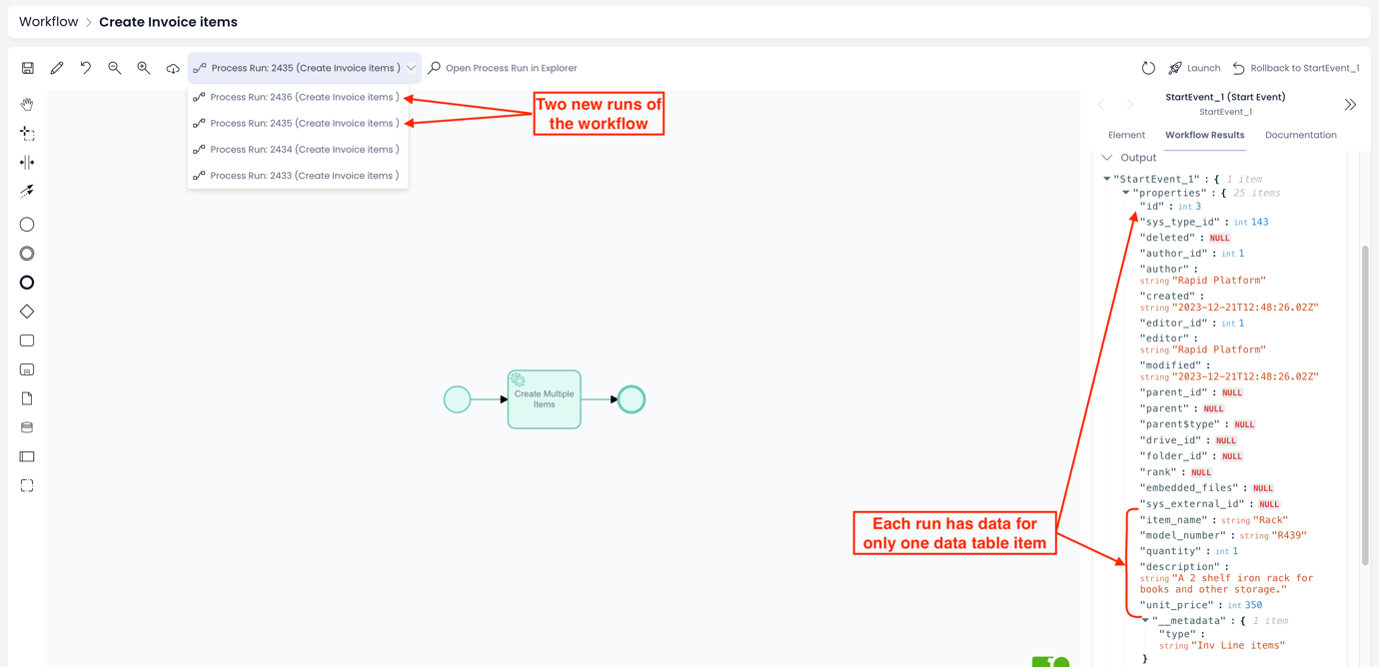
As depicted below, the workflow is executed twice (as there were two items selected in the data table). The output of the Service Task shows a single item being passed per workflow execution.
- All the properties of triggering workflow via a menu item remains the same. For instance, passing inputs to the workflow.
- In case of multiple requests, if input parameters are passed on click of the menu button, all the workflow executions will receive the same set of parameters as inputs.
- Neither Single Request nor Multiple Requests do not have any practical utility if the menu button is located at the Item Level.
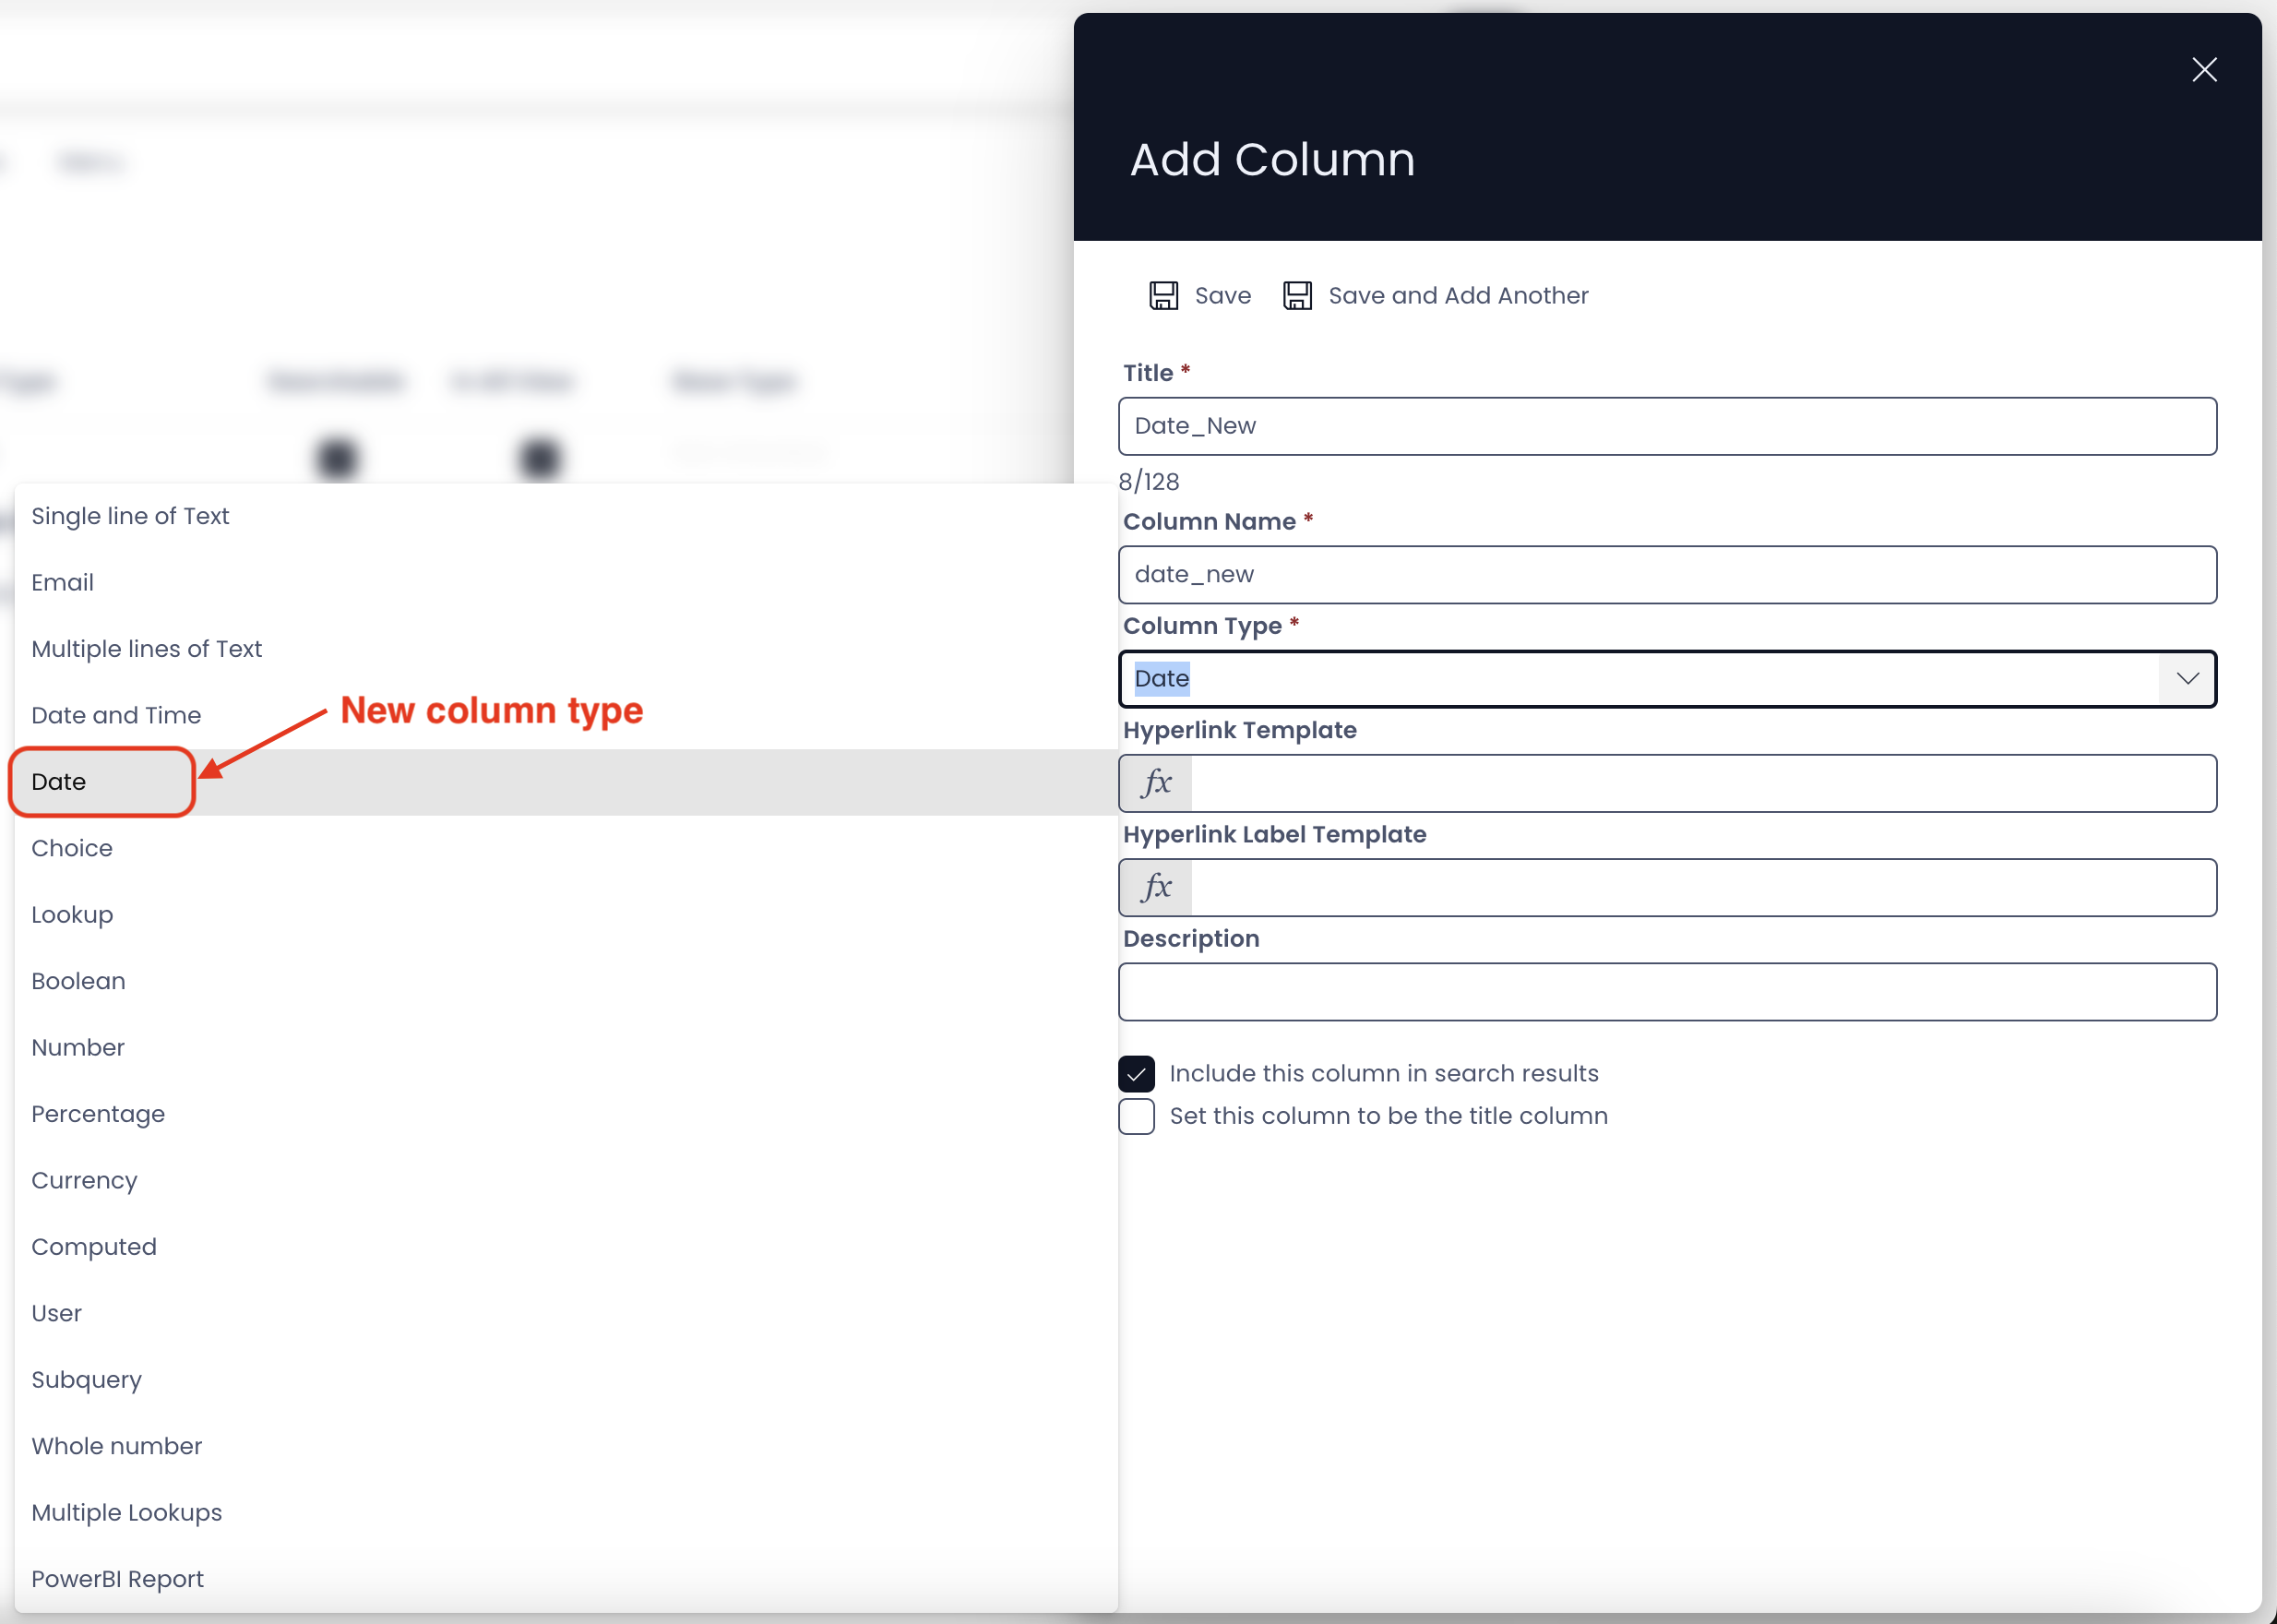
4. A New Column Type - DATE
We now have a new type of column in Rapid Platform. This is titled - "Date".
Need for this type and Difference from existing Date and Time type
It is important to note that we already have a Date and Time type of column.
In Explorer Data Table view or Item Details both "Date and Time" and "Date" type may appear to hold similar information.
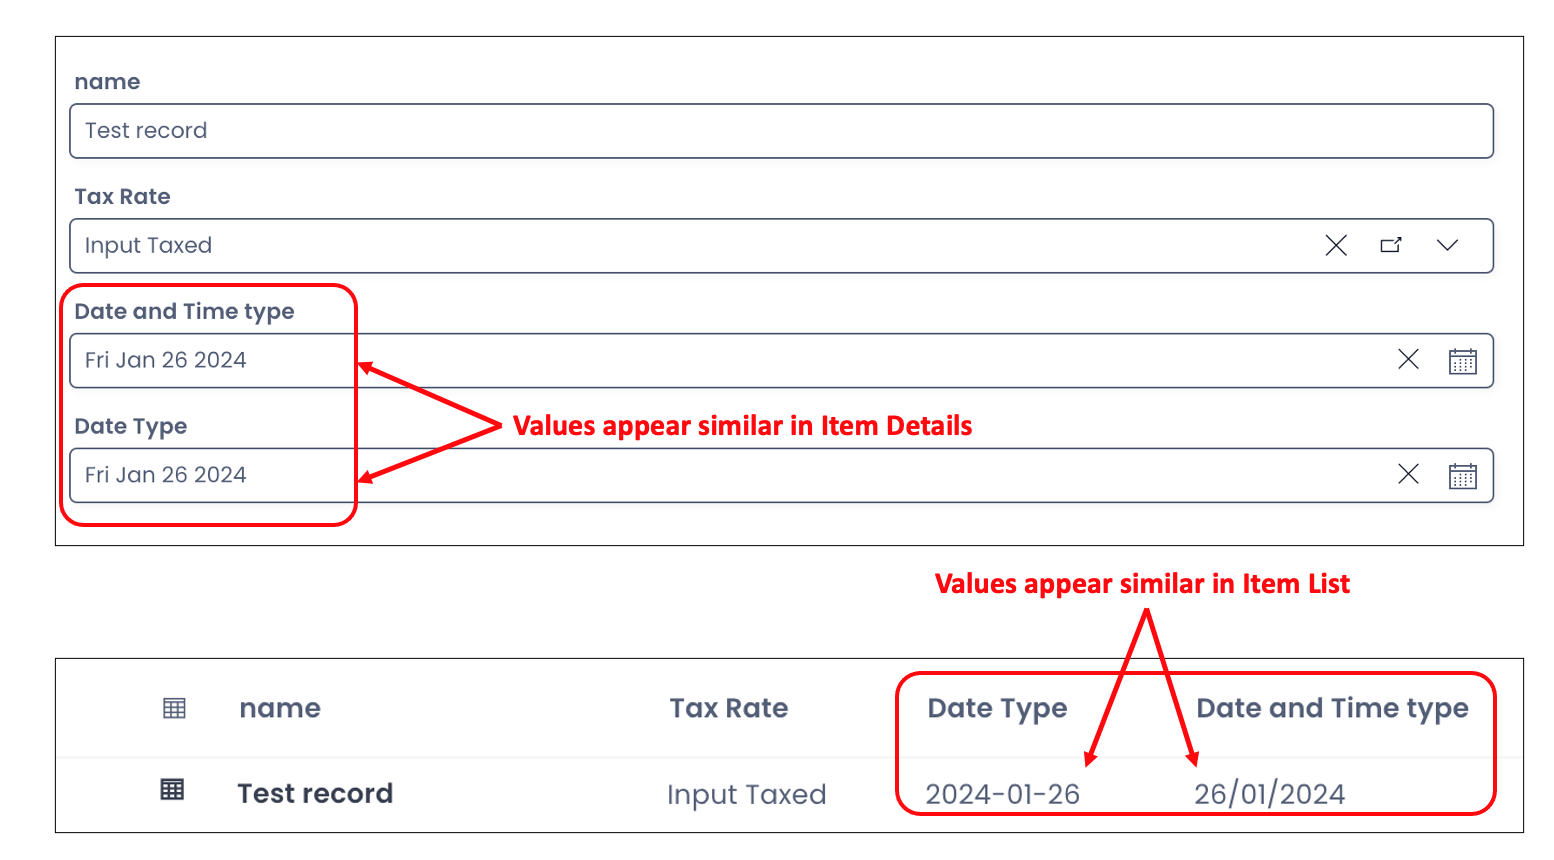
However, Date and Time type always stores values in full time stamp format, that is, the value will be stored in the field as date appended with time value. For example - "2024-01-24T06:17:58.438Z"
Now, certain fields require only a date to be stored, for instance, Date of Birth, Joining Date, etc. Having a date and time does not hold relevance in such cases.
Hence, the need for the Date type.
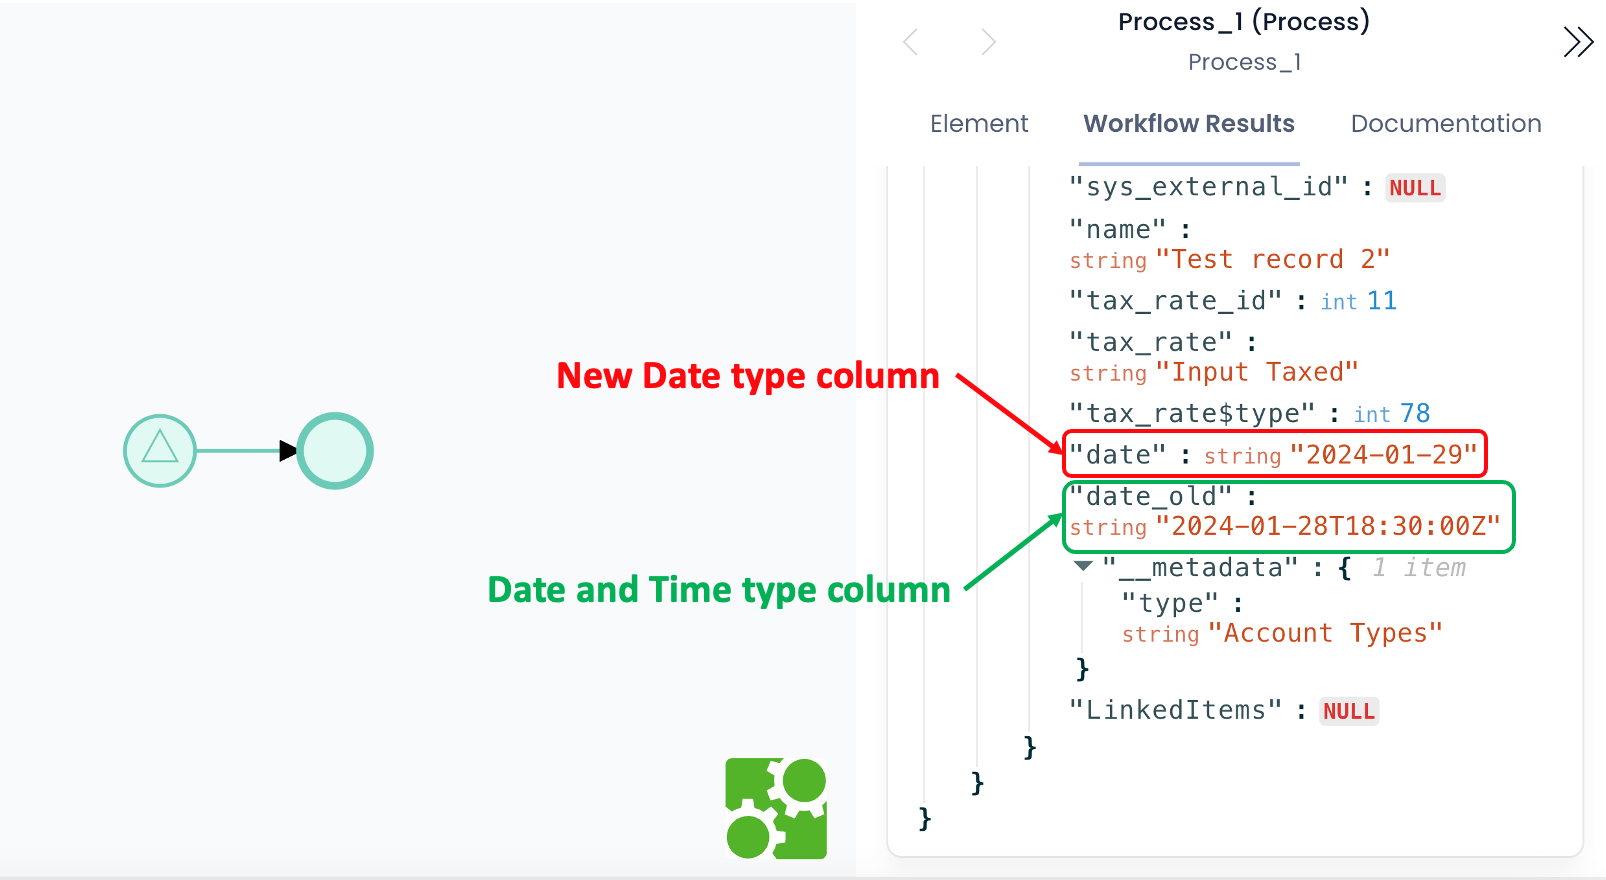
In the below image, "date_old" is the Date and Time type and "date" is the new Date type of column. We can clearly observe the difference in values for two column types.
-
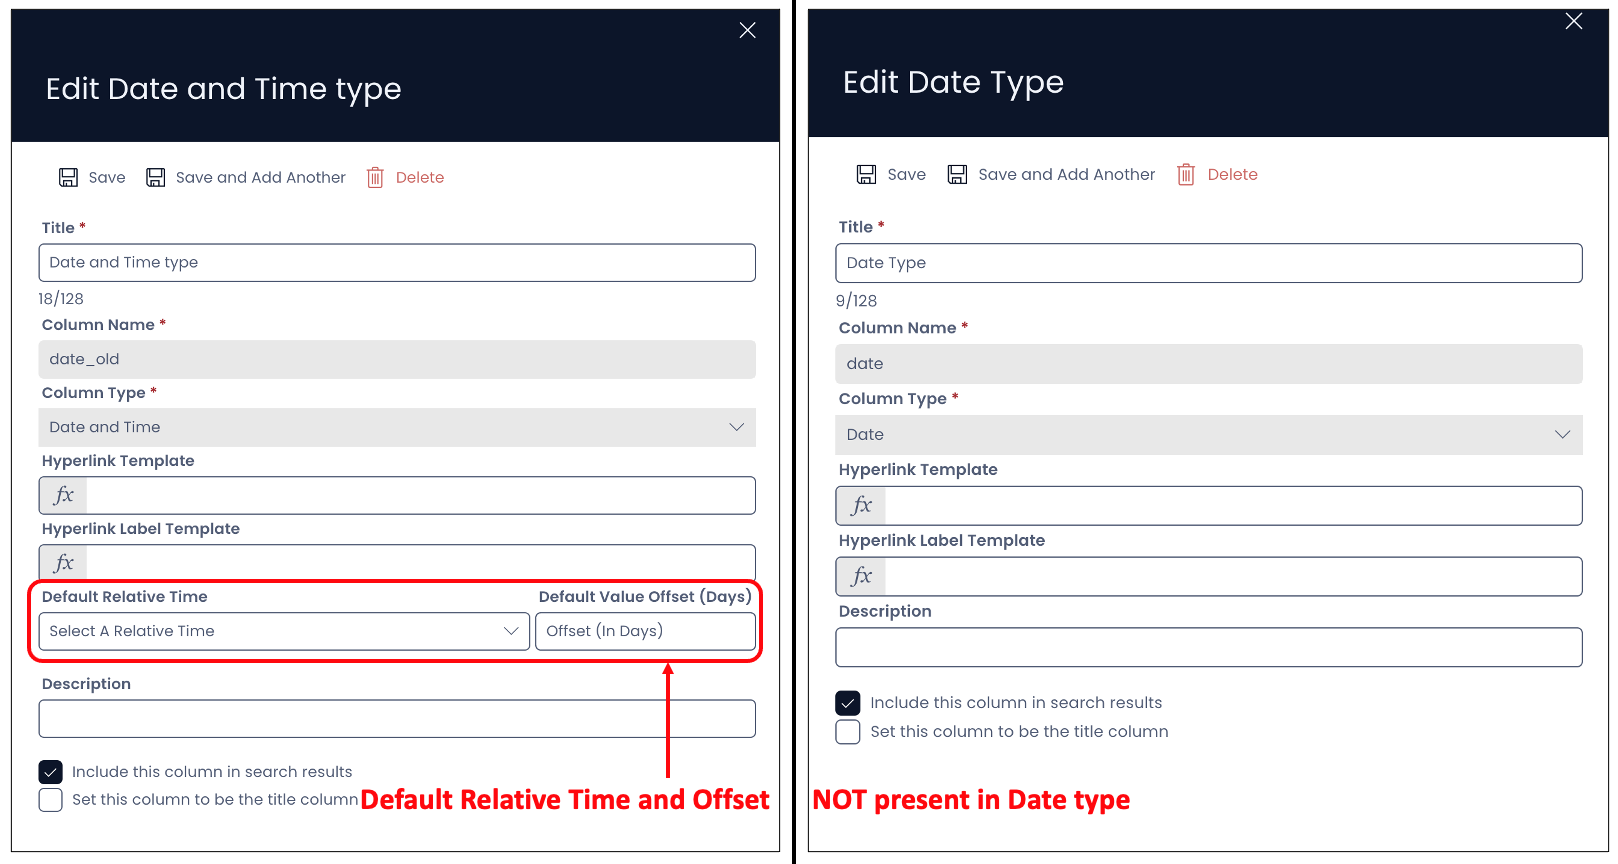
Date type does not have any Relative time or Default Offset settings, unlike Date and Time type.
-
At the database level, the Date type stores value in the format - YYYY-MM-DD.
-
All the other column properties apply to the Date type like - it can be set as title column, toggle if this column can be "Searchable", toggle if the column can be "In All View", the method to add or edit the column etc.
-
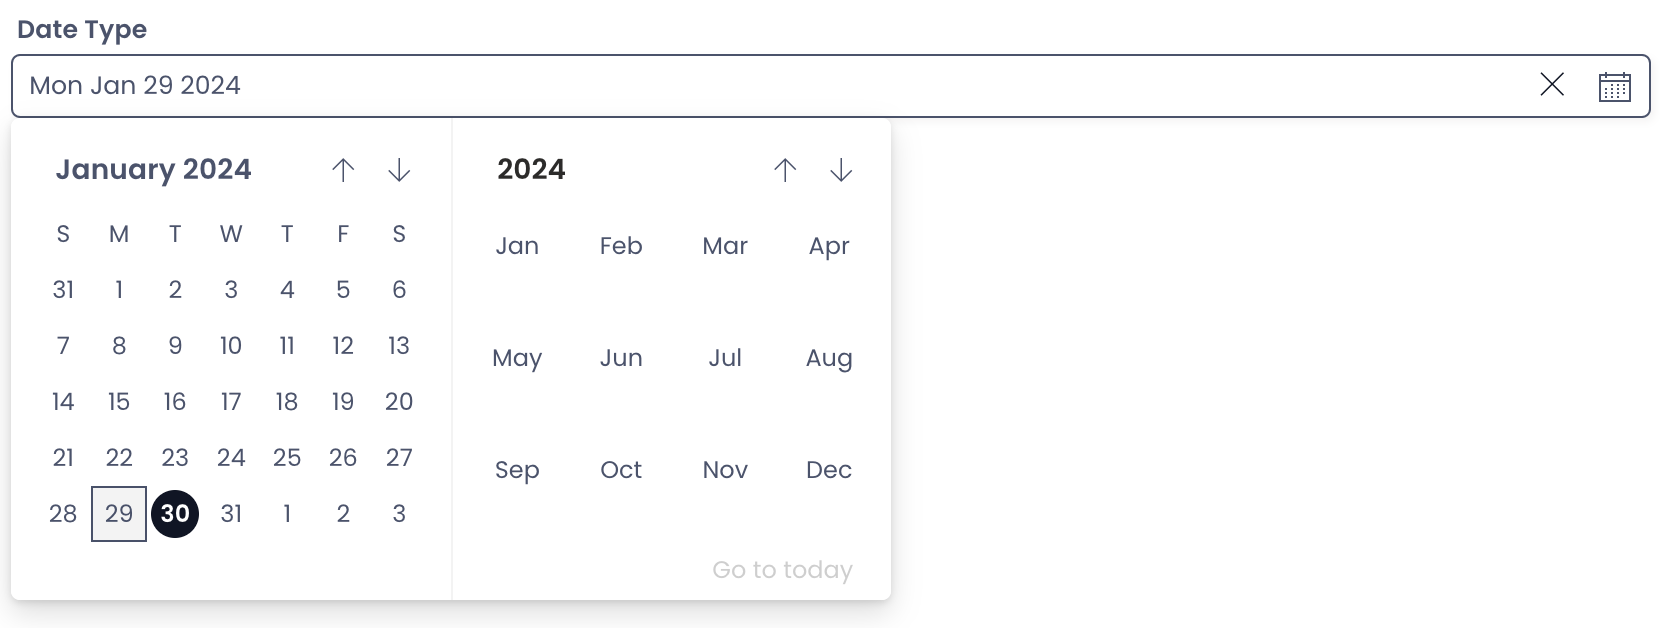
In the Explorer UI, the Date field appears with a Date Picker just like the Date and Time type.
5. Sanitised Output file naming in Fill Document type Service Task (Docx)
The Fill Document type of Service Task is used to generate files from a Docx template. You can generate files which can have dynamic data sourced from specific Data Table fields. This can be used for various business purposes like automated generation of invoices, purchase orders, transaction receipts, newsletters etc.
Need for this feature
It is important to note that the output file(s) generated via the Fill Document type Service Task is placed in a SharePoint folder.
SharePoint has general rules defining invalid characters and character sequences which should be avoided for a valid File / Folder name.
The below image displays the rules for invalid characters while naming a file / folder in SharePoint. To learn more - click here

[Before this feature] If the user while configuring the Fill Document type Service Task workflow, named the Output file with the invalid characters, then an error appeared.
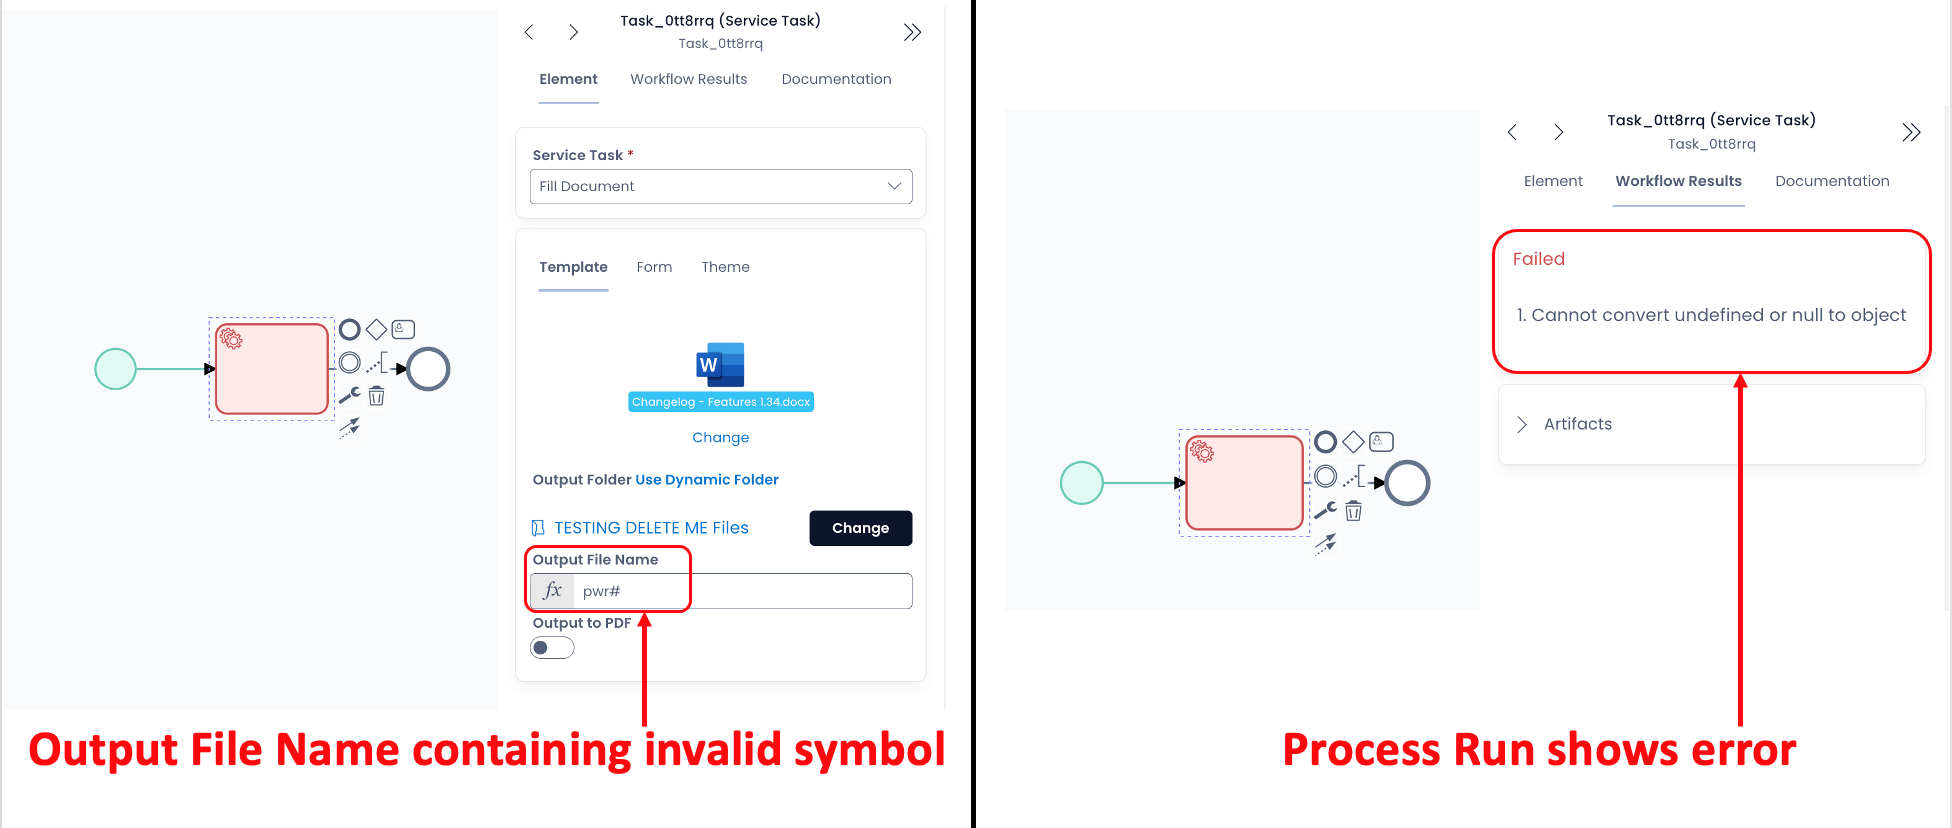
[After this feature] If the user while configuring enter the Output file name with invalid characters, then the system will automatically sanitize the Filename by replacing the invalid character(s) with "_"
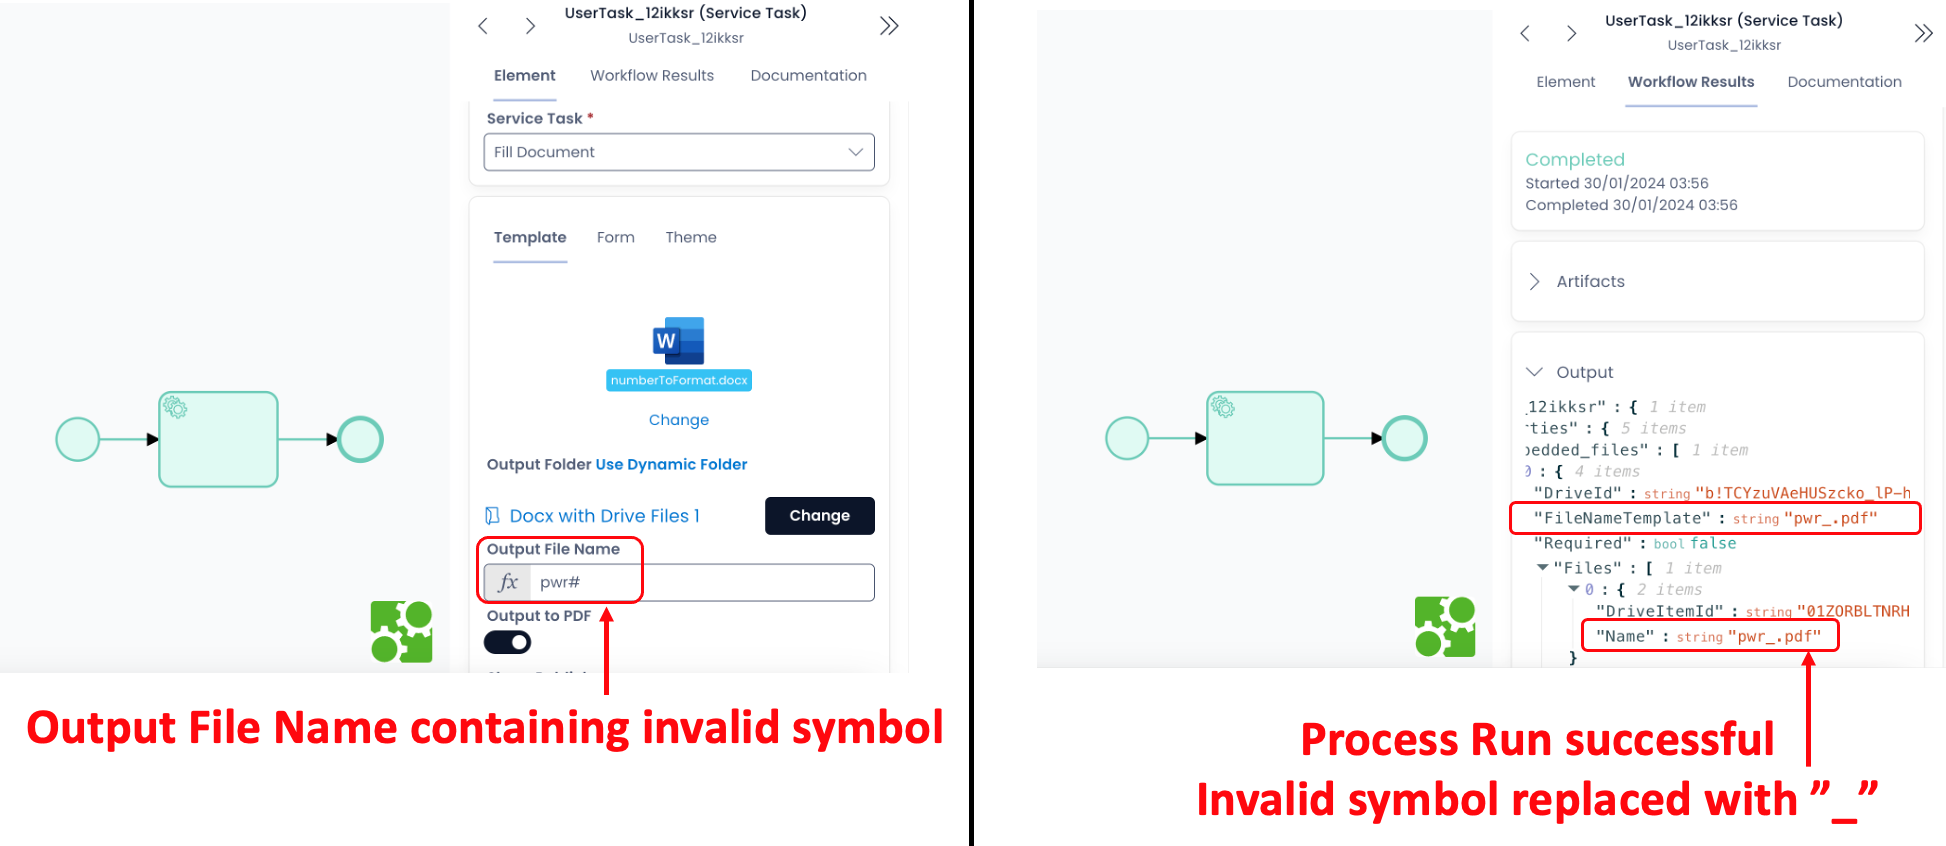
Sanitized files do not throw an error and will just happily continue on even if you don't expect it.
6. Rapido - The AI Chatbot based on Documentation
This release unveils RAPIDO - Rapid Platform's AI Chatbot. Rapido is a GPT powered AI application that responds to user queries about how to use Rapid Platform. Rapido is trained on Rapid Platform's Documentation.
How to access Rapido?
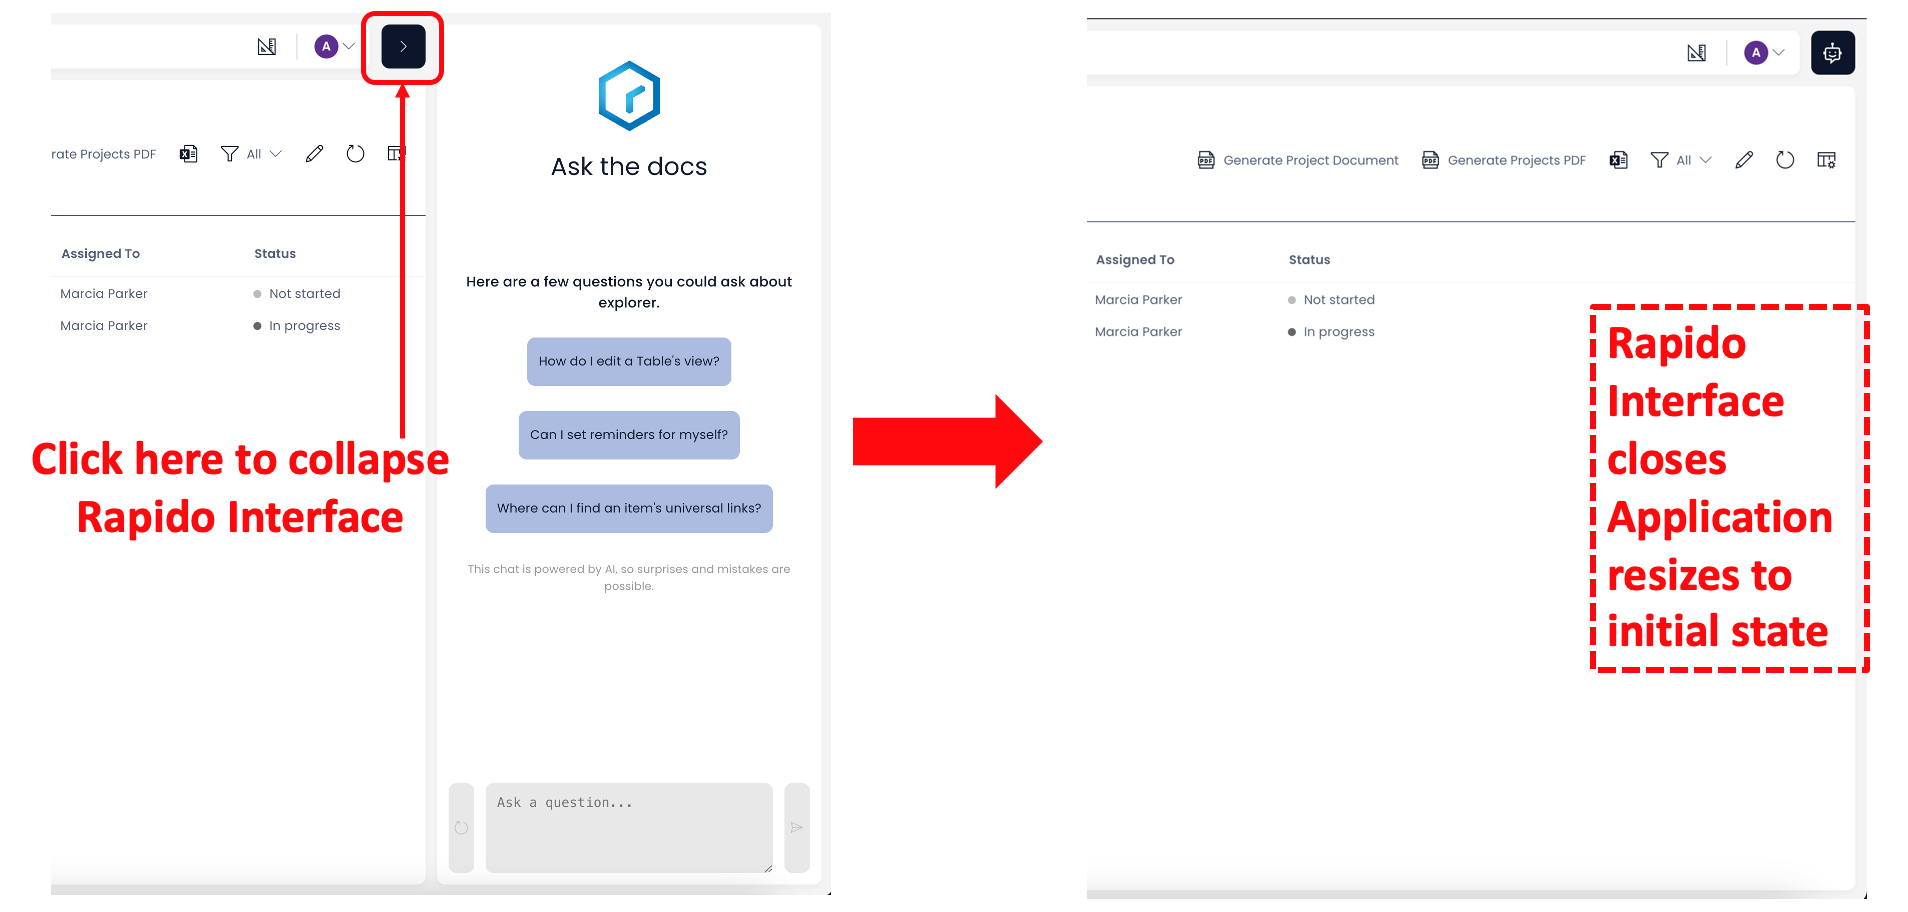
You can access Rapido from the top right corner of your Rapid environment.
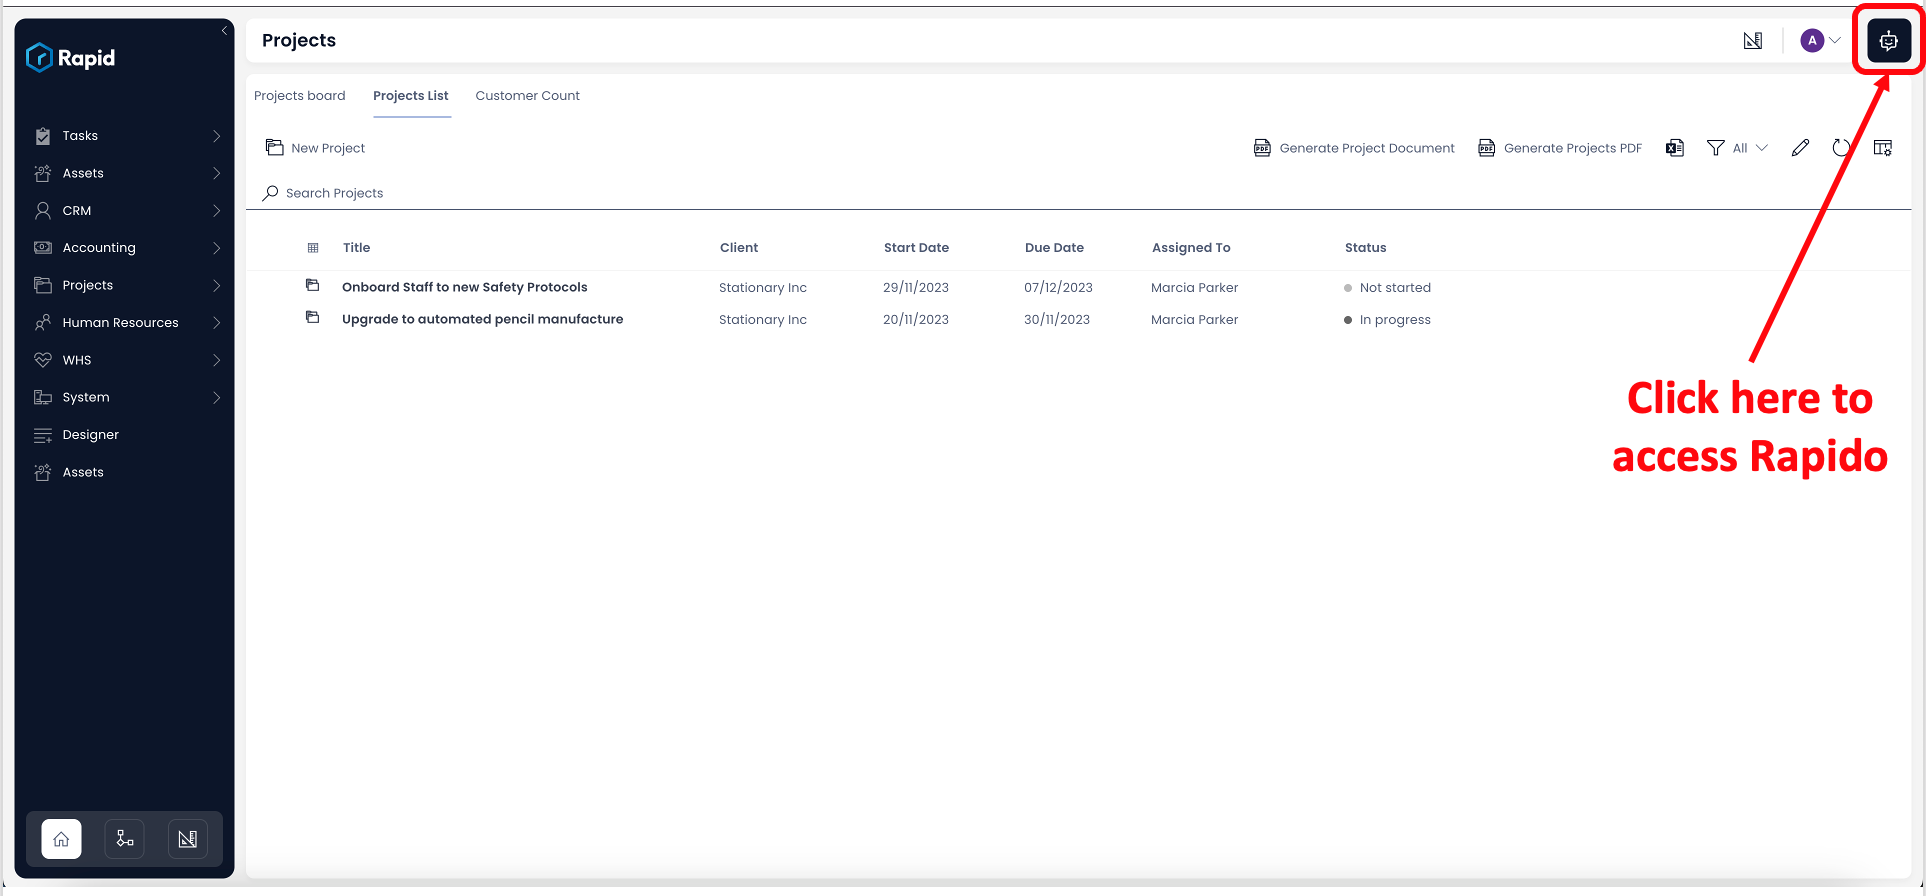
This icon is present throughout the Rapid environment irrespective of the application - whether Explorer, Workflow or Designer.
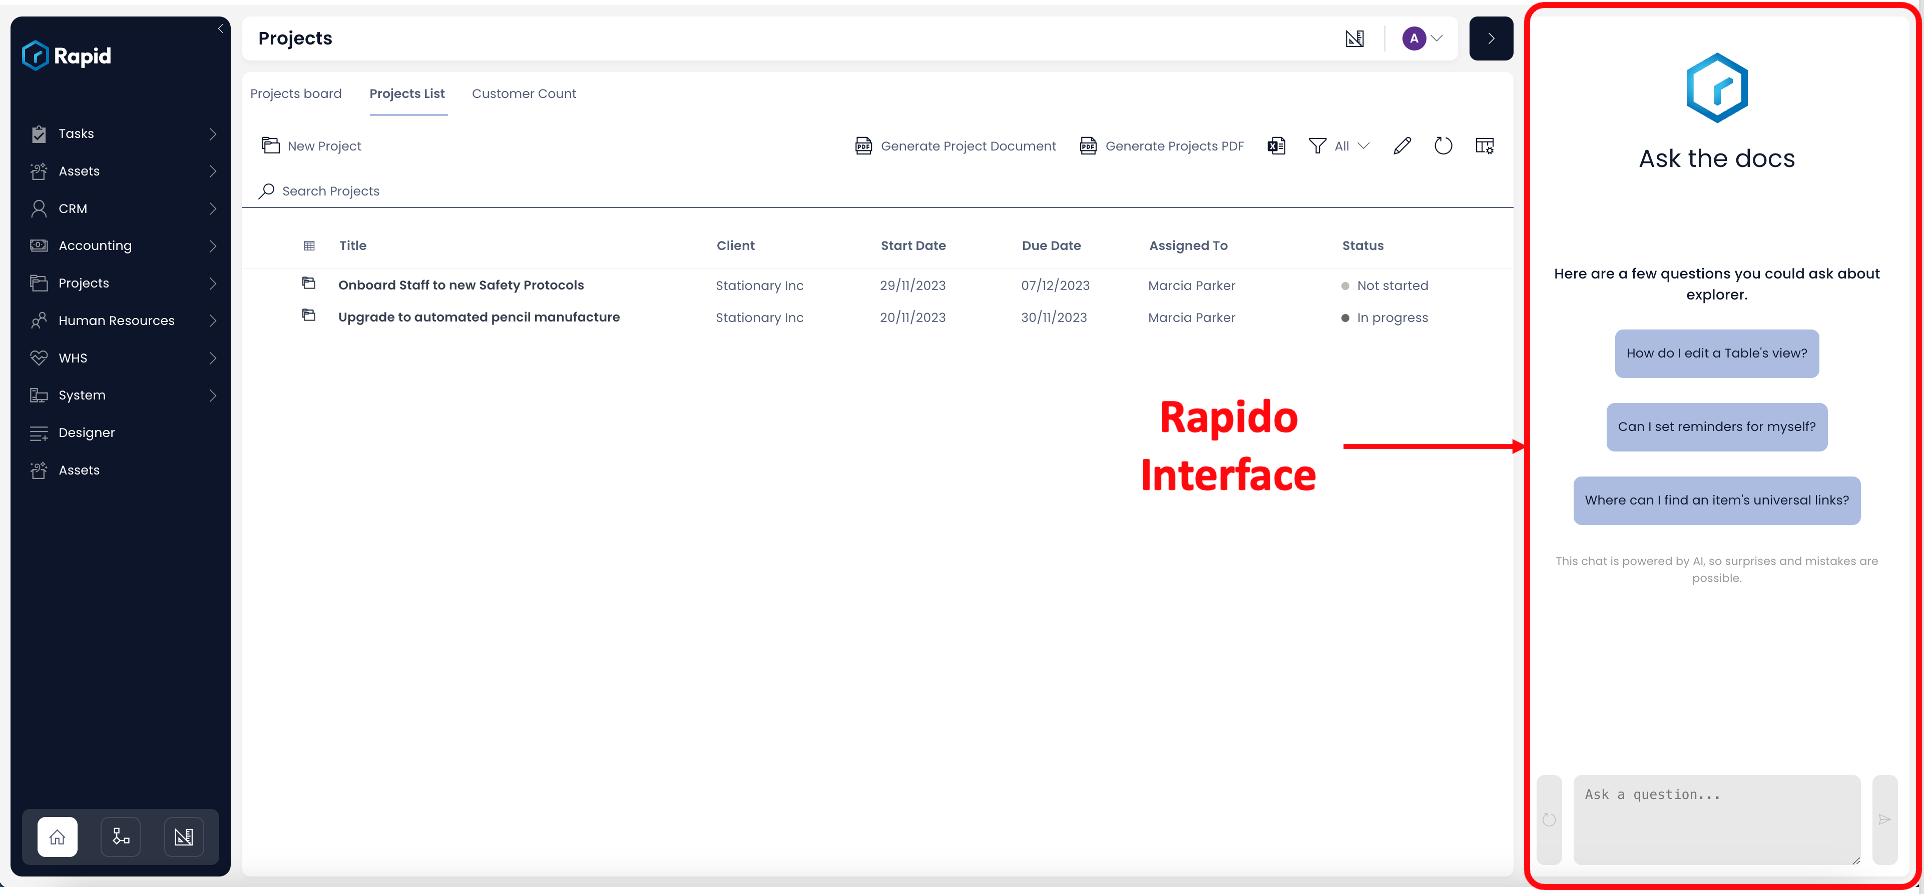
To access Rapido, just click on the icon. This will open the Rapido interface for you to ask questions.
To close the Rapido interface, just click on the collapse icon.
What are the key elements of Rapido?
Suggested questions:
To assist users in formulating their thoughts, Rapido provides a set of three suggested questions. These questions are based upon the application from where you access Rapido - that is, Rapido will suggest different questions if you access it from Explorer, Workflow or Designer. This intends to build a bit of a context on your role.
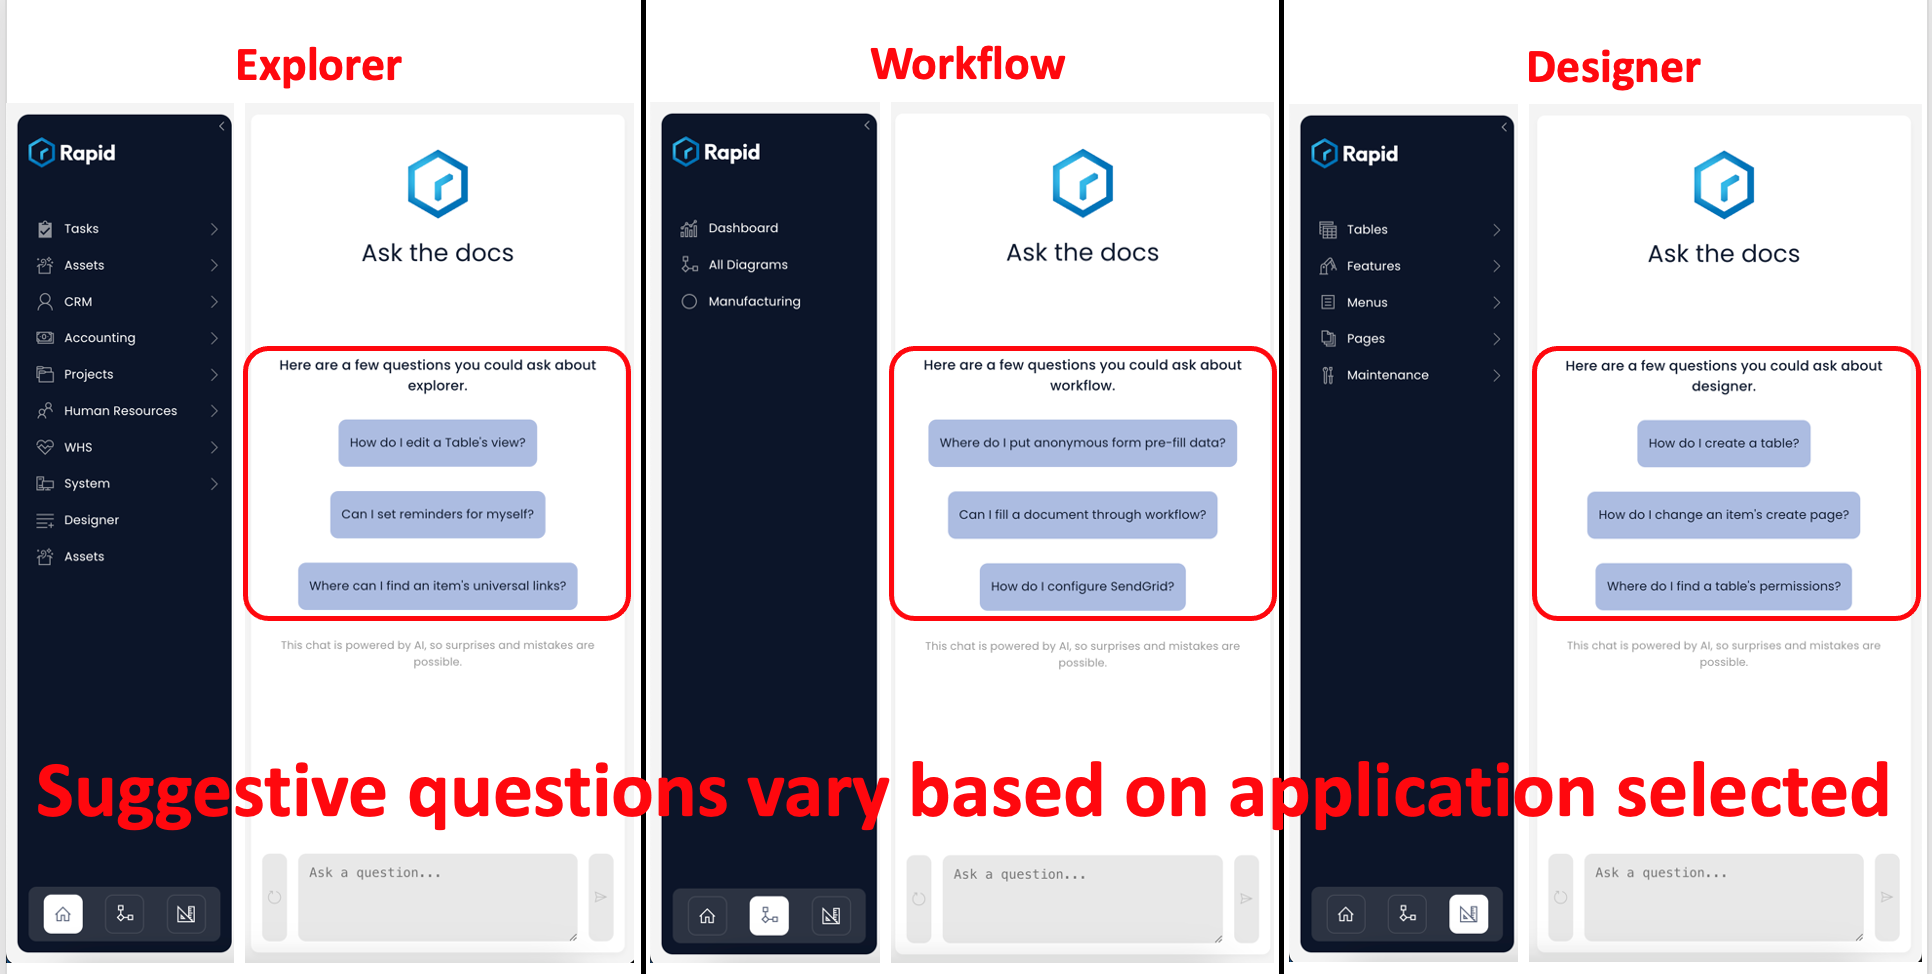
You can click on the suggested question and Rapido will consider it as a question to answer. You do not need to type it then.
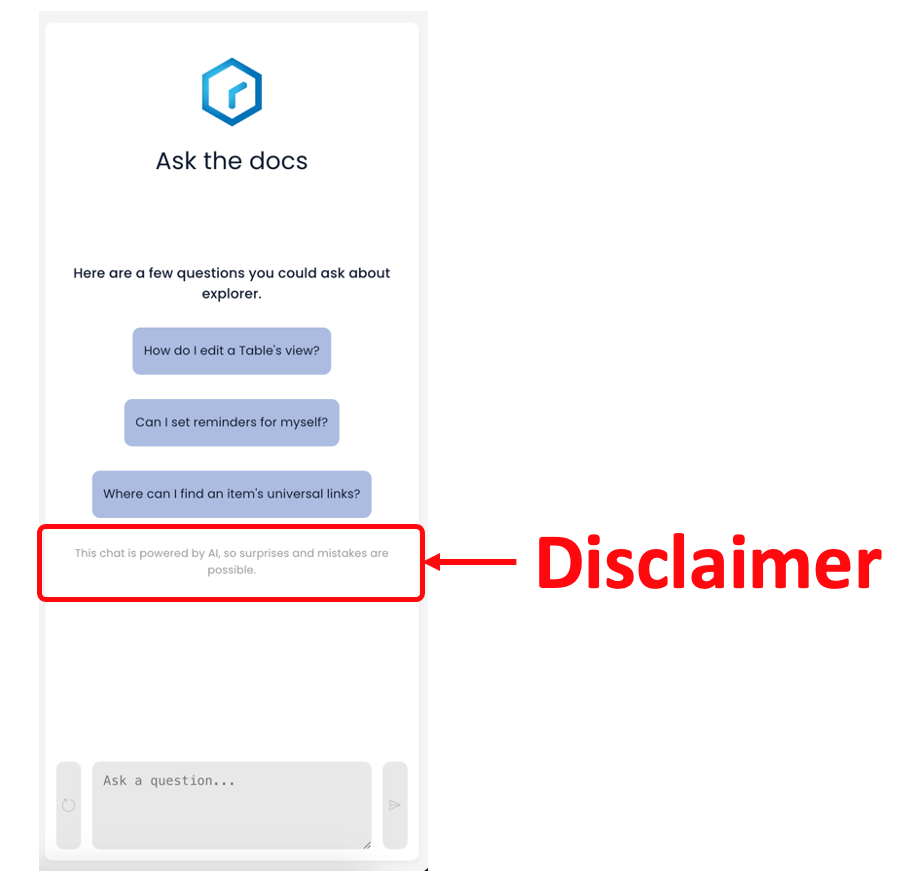
Disclaimer:
Please note the disclaimer (highlighted below). Because Rapido is a Chatbot, it is prone to interpretation and response faults. The links to source documentation are provided with responses, in case you wish to verify / take a closer look at the information provided.
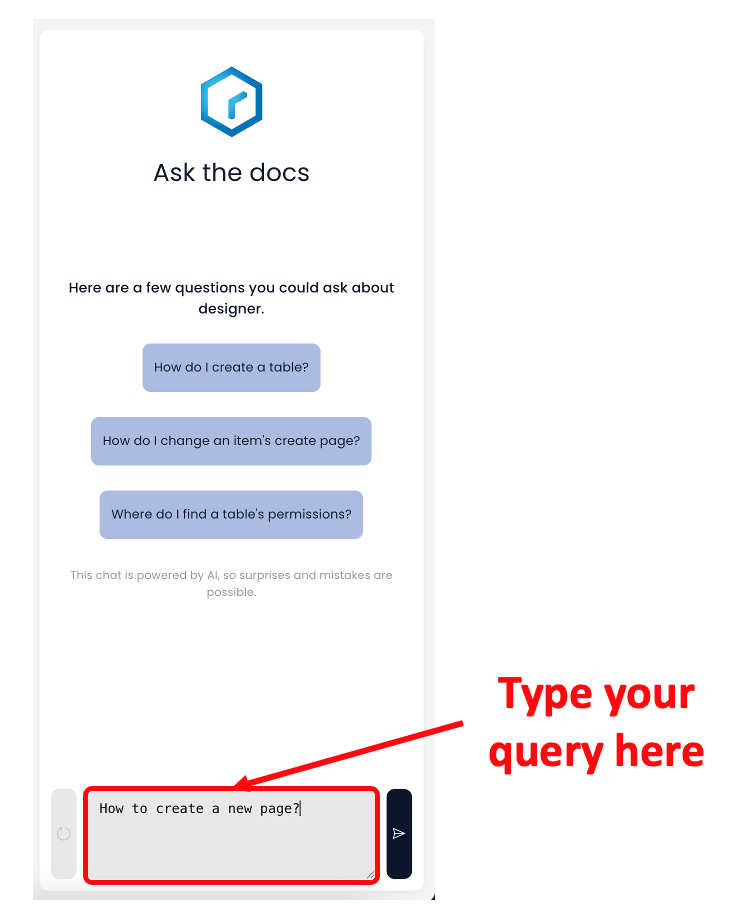
Query box:
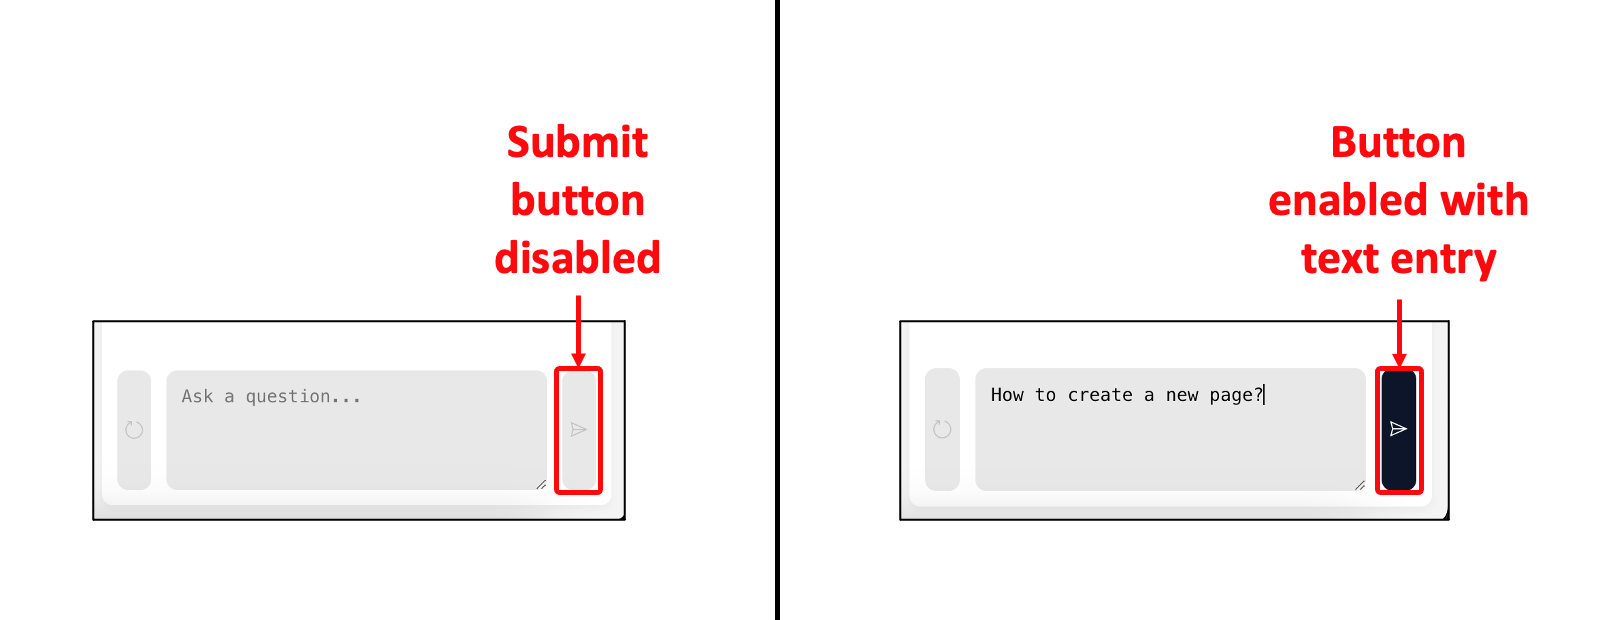
This is the text area where you can type in your desired question. For example - if you wish to learn how to create a new page, just type it as shown below:
Submit button
Once you have typed in your query in the Query box, you can click on the button to submit the query to Rapido.

You can press enter to submit your query text.
The Submit button is enable only when some text is entered in the Query box, else it is in disabled state.
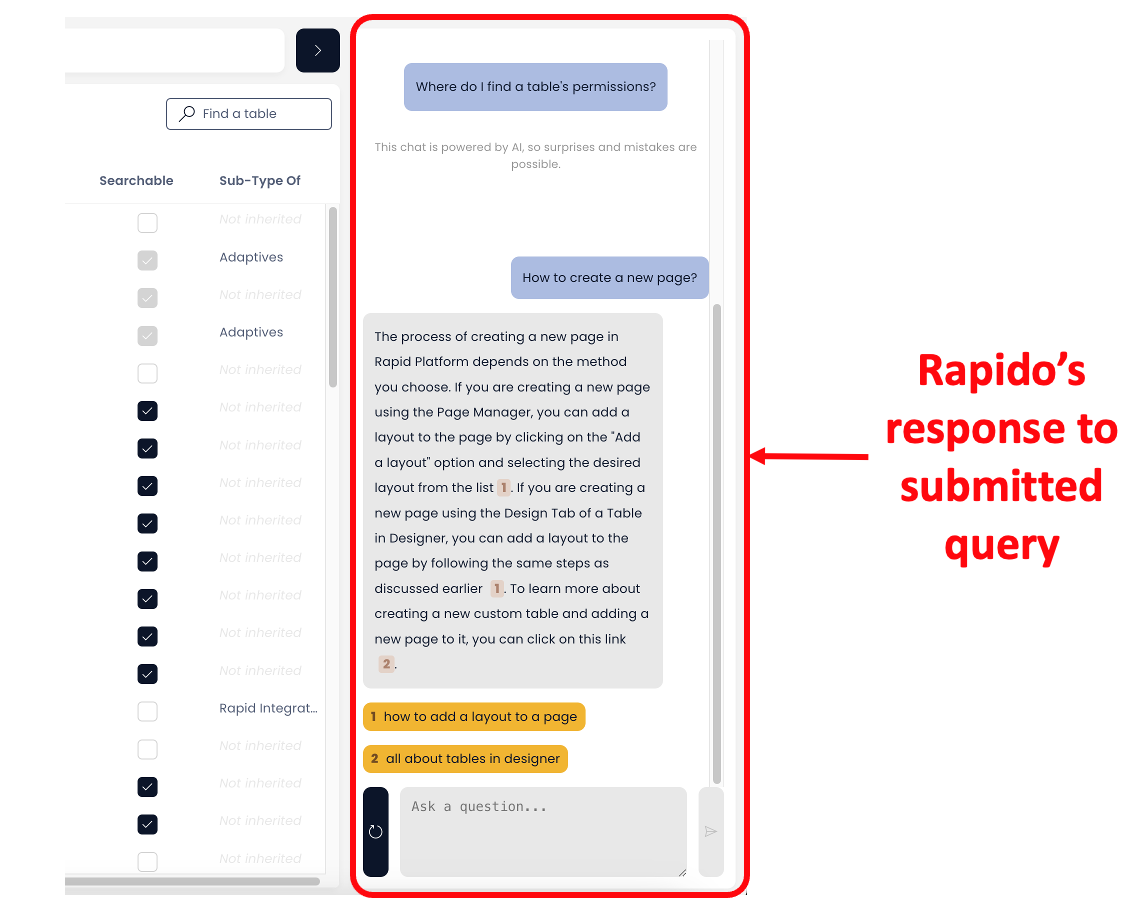
As you submit a query, Rapido will assimilate it and return a response.
Refresh button
Clicking on this button will refresh the chat session, clear history and bring Rapido to its initial state.
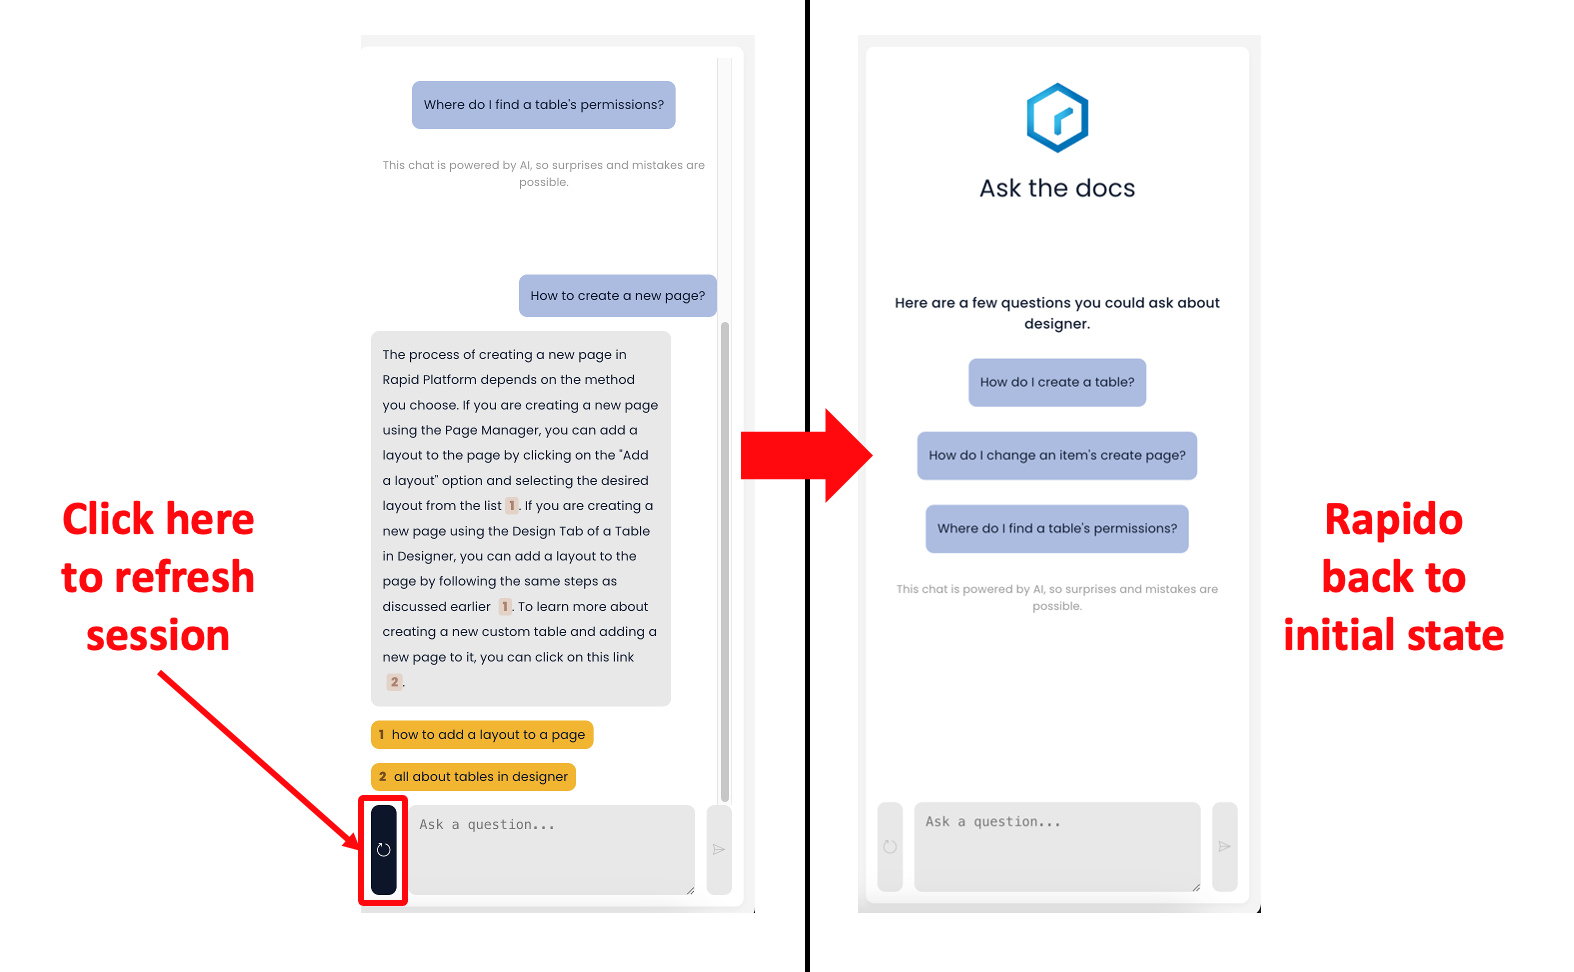
The Refresh button is enabled only when your session with Rapido has at least one chat, else it remains in disabled state.
Some key features of Rapido
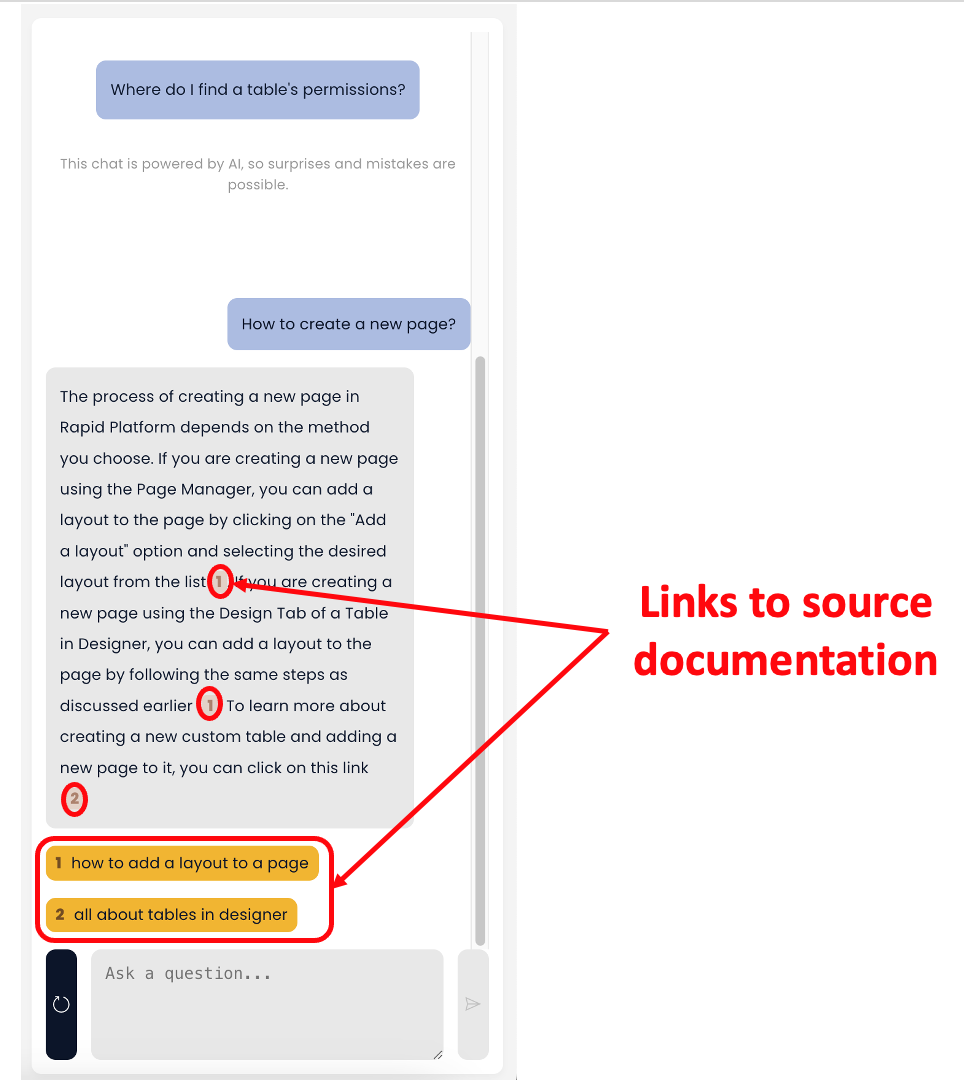
- Rapido responses provide a link to the source documentation. Should you wish to read further, you can click on the link and it will navigate you to the documentation page in a new browser tab.
-
You can ask subsequent questions to Rapido in a session. Rapido will analyze your questions and form a context. Hence, with every new question Rapido will attempt to refine its answers smartly.
-
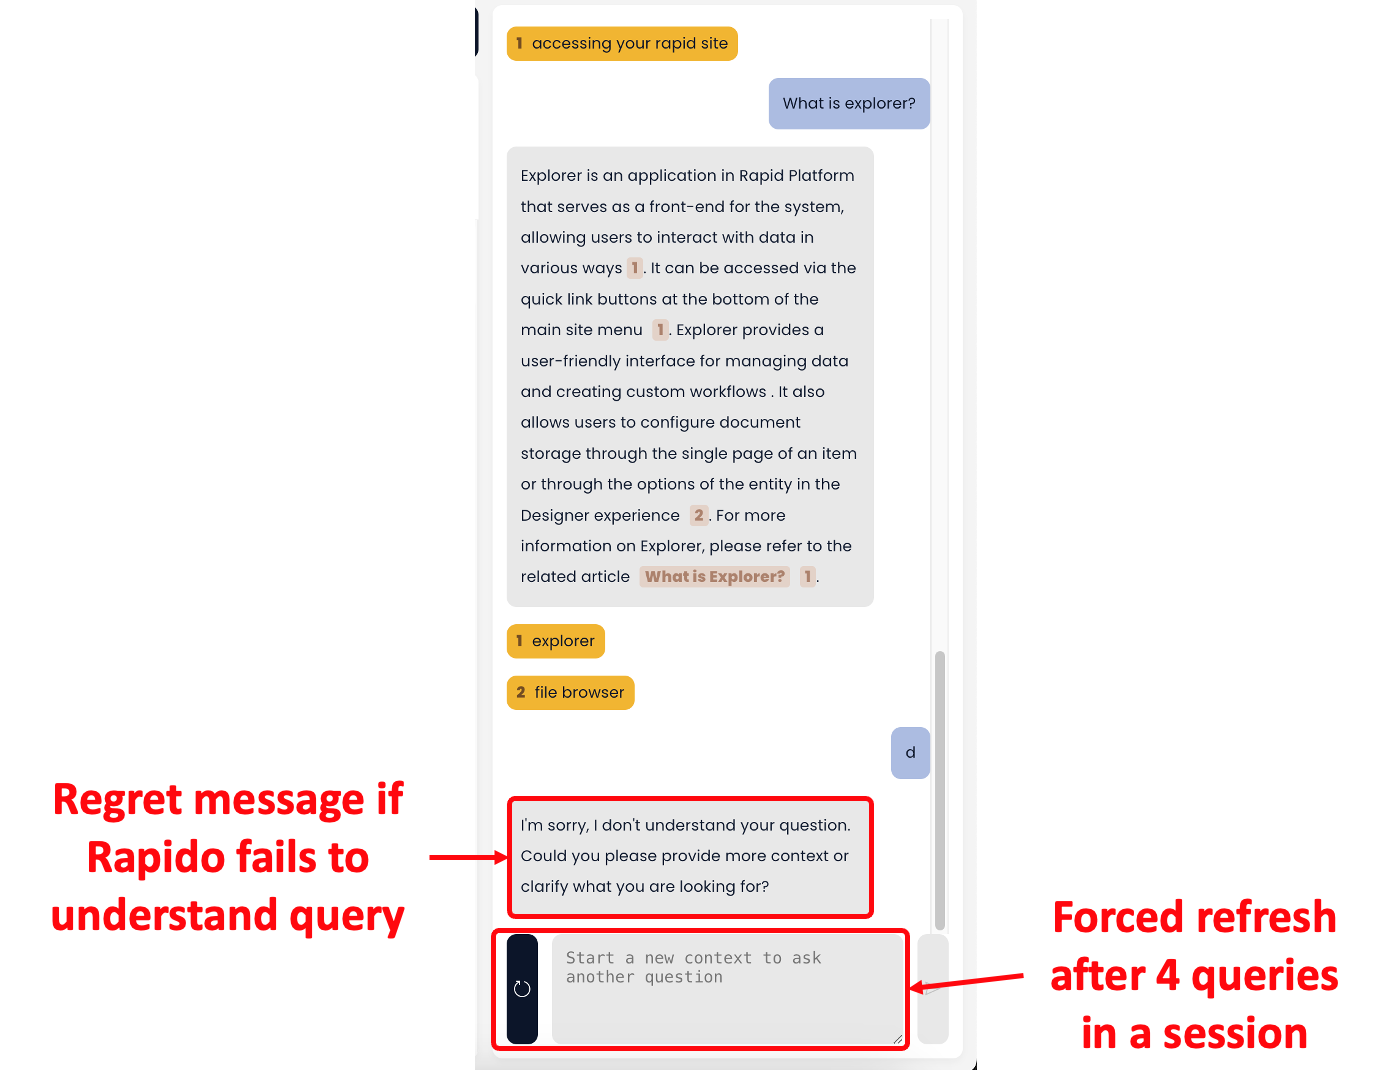
There can be maximum of 8 messages (a set of 4 questions and corresponding answers) that can be held in a chat session. Once you have received 4 answers, Rapido will force you to Refresh the session to continue. (shown below)
-
If Rapido does not know an answer to your query, it shall respond with appropriate regret response. (shown below)
Improvements
- Added Explorer menu option to link directly to an Adaptive Document as a Public Form
- Improved Universal Link page component to display larger and more useful modal screen
- De-cluttered site install wizard, removing sub-site support
- Added toggle to generate public share links on DocX generated files
- Prevented Enter button from closing Explorer menu button forms
- Removed secondary scroll from the 'Select a Folder' modal when configuring default folder templates on lists
- Improved drag handling and hit area for the File Browser
- Fixed out of date state being presented when viewing process runs in Explorer
- Improved speed and response times of Menu configuration page
- Added currency formatting support to DocX glyph library
- Added expand button to File Browser preview panel
- Improved typing support to Date components
- Improved array support in Lodash functions when using Create Items service task
- Enforced process runs are linked to their generating item when using the Execute Process menu action
Bug Fixes
- Fixed @myGroups OData filter failing to regard groups of groups
- Resolved inability to toggle menu buttons to Both after selecting Table/Item
- Updated default link in Explorer to Workflow to respect new dashboard path
- Fixed cases where Send Email service tasks didn't
- Prevented a page crash when configuring Create Item service tasks
- Enabled the Create Item service task to regard the target table SharePoint file configuration
- Handled null input cases on Create Item service task
- Handled error cases when generating an item with a User field through the Create Item service task
- Prevented Correspondence Integrations items generating a second, empty key
- Fixed Choice fields crashing in Firefox
- Fixed deleting a lookup failing to clean up after itself